ralf | August 1, 2016 | Annual, overland, Tutorial
 Scorching desert, scouring dust storms and bleak landscapes are the daily lot of your adventuring party? Cruel magic has stripped most life from the surface of your world? This month’s Scorching Sun drawing style by TJ Vandel will let you map this kind of landscape in beautiful detail. Click the image on the right to see a high-detail version of the included example map.
In addition to the style, the included mapping guide gives you two tutorials on topics that come up in CC3+ mapping occasionally: How to add islands and lakes on top similar features without them getting obscured, and how to import fill styles from one drawing style into another.
The issue is now available for CC3+ from the registration page for all subscribers. If you haven’t subscribed to the Annual 2016 yet, you can do so here.
2 Comments
ralf | May 14, 2015 | Apple, CC3 Plus, Installation, MacOS, Tutorial
by Steve Townshend
I began using Profantasy software around 1999 when Campaign Mapper, a basic version of Campaign Cartographer, came bundled with TSR’s AD&D Core Rules 2.0 CD. That program sparked my passion for the software and I purchased virtually every release over the next decade. In 2009, changing technology and changing lifestyle changed my hardware needs, and when my last (very big) desktop PC broke down I replaced it with a (very small) Macbook Pro. While that machine was the right choice for me, I could at first only run Campaign Cartographer via a slow, quirky virtual machine, and with sadness I gave up CC3 almost entirely. Until now.
If you’re a Mac user interested in running the best fantasy mapping software in the industry, you’re in luck. The newer, faster CC3+ can now be installed and run without Windows, and aside from a few minor quirks its performance on the Mac is better than ever.
This tutorial focuses on how to install CC3+ on a Mac using the Crossover application created by Codeweavers. We’ll begin by examining a few of the other common options in brief. This installation was done on a late 2013 Macbook Pro running OS X Yosemite.
Boot Camp and Virtual Machines
In the past, a few options have existed for running CC3 on a Mac. Some users preferred to use Apple’s Boot Camp to set up their Macs with a Windows partition so that they could choose whether to load Windows or Mac OS.
Others used virtualization software like Parallels or Fusion, programs that allowed the user to load Windows on a virtual machine without the necessity of logging out of Mac OS and into Windows.
Those options may remain good choices for users that regularly work with multiple Windows applications. However, if you’re not using many Windows-specific programs on your Mac this may not be your ideal solution, as you’ll devote a large chunk of disk space for a Windows installation that you’ll rarely use. On the occasions you do use it, you’ll need to wait through the installation of multiple updates that you missed since the last time you loaded Windows. These Windows updates can take a long time to download and install. In addition, you’d have to purchase a Windows license as well as the Parallels or Fusion product.
An application called Wine circumvents Boot Camp and virtual machines altogether, placing Campaign Cartographer front and center on your machine so that it works similar to any other Mac application.
Wine
Wine is a “compatibility layer” that allows Windows applications to run in other operating systems like Mac OS without installing Windows.
Wine is open source software and free to use, and it can capably run Campaign Cartographer. Various individuals and companies have adapted their own versions of Wine, including supported, purchasable products like Crossover, which we will use to install CC3+.
If you own Campaign Cartographer and haven’t upgraded to CC3+, or you don’t wish to purchase Crossover, then the free Wineskin Winery is another option. On the Profantasy Forums my friend Ryan Sturt provides a solid walkthrough on how to install CC3 using Wine.
*Drawbacks and Limitations: Installing Campaign Cartographer through Wineskin Winery can be tricky and may necessitate a little trial and error. As usual, it’s a good idea to back up your computer using Time Machine before installing new software. In addition, running CC3 in a maximized window sometimes yields sluggish performance.
Crossover
For a smoother installation and simple interface there’s Crossover, a supported version of Wine, by Codeweavers. Use Crossover if you want the easiest and fastest Mac interface for CC3+ and you don’t mind purchasing some software in order to run it.
Crossover uses separate “bottles” to store programs. Each bottle is its own virtual Windows environment with c drive, folders, and registry, but without the Windows files that typically fill those folders.
Crossover offers a 2-week free trial with which you can install and run CC3+ on your Mac and decide whether this option will work for you. If you decide to eventually purchase the software, be sure to click the More Options button on the product page in order to see the least expensive ($40) purchasing option that includes 1 month of software support. Since Crossover doesn’t officially support Profantasy Software, paying for additional months of Crossover is not likely to be worthwhile. At your option, you can sign up for the Codeweavers mailing list; they occasionally offer promotional codes for Crossover discounts.
*Drawbacks and Limitations: While Crossover will easily install CC3+ (as well as CC2 and Fractal Terrains), it does not appear to be able to install the old CC3.
Installing CC3+ on a Mac Using Crossover
Follow these steps to install Crossover and CC3+ onto your Mac running OS X.
1. Download CC3+ onto your Mac. You can access your registered software on Profantasy’s site after you log in and click Your Registered Products. Select the Downloads & Updates tab and then download your software. You won’t install it yet, however.
2. Now download and install the free trial of Crossover.
3. Launch Crossover from the Launchpad or from your Applications folder.
 4. After you open Crossover, select the Install a Windows Application button.
Alternatively you can select the Bottle menu item at the top of the screen and select New Bottle (I usually select a Windows XP bottle) or click the + sign at the bottom left side of your Crossover window and select the same option. You can name your bottle CC3+, or Campaign Cartographer, or whatever you choose. That process is a little more straightforward, but the Install a Windows Application button is more evident onscreen.
 5. If you used the Install a Windows Application button Crossover will prompt you to install the application. Campaign Cartographer isn’t listed on the menu of supported applications so scroll to the bottom of the menu to Unsupported Applications > Community Supported Applications > Other Application. Then click Proceed.
 6. On the next screen select Choose Installer File and navigate to the place where your Campaign Cartographer download “CC3PlusSetup.exe” is stored on your machine (by default it will be in your Downloads folder) and select the setup file.

 7. Before you go farther, select the Edit button beside the next menu, “Will install into a new Windows XP bottle Campaign Cartographer 3.” This will allow you to name the program. I call it “Campaign Cartographer 3.” If you don’t name it prior to the installation, your CC3+ program will appear as its file name instead (i.e. “CC3PlusSetup”). You can select any Windows bottle you like, not just Windows XP.
If you do forget to name your program, you can rename it later.
 8. If you’ve ever installed a Profantasy product, the screens that follow will look familiar. Simply follow the prompts, enter your serial number (found on Profantasy’s Registered Products page), and unless you have good reason to do so, use the default directories that the installer chooses for you.
9. Once you’ve finished the installation, the Profantasy installer will typically ask if you want to launch the program. It’s usually best to UNCHECK that box. This will let Crossover finish its work (you’ll see Crossover’s progress bars reach the end).
 10. Click the CC3+ icon in your Crossover menu. Time to start making maps!
* Known Issues: Right now, text doesn’t always work quite right on any version of Wine. It’s likely that you’ll need to fix text on your old maps and experiment with text spacing when making new maps.
CC3+ usually works better in a window rather than as its own desktop. For instance, if you click the green maximize circle and allow CC3+ to be its own separate desktop window, you may experience slower performance. If you instead drag the corners of the CC3+ window so that it occupies the majority of the screen, you’ll have approximately the same workspace but without the performance issues.
Installing Add-ons
Installing add-ons like Dungeon Designer and City Designer into your CC3+ program is simple once you know where to start.
– As usual, begin by downloading your software from the Profantasy site.
– Open Crossover and select the bottle where you have Campaign Cartographer Plus installed. Select the Run Command icon (or select it from the menu under Bottle > Run Command). Then, Browse for the file you’ve downloaded and open it.
– The Profantasy installer will begin. Follow the prompts to enter your serial numbers and complete the installation.
Not all of Campaign Cartographer’s add-ons are currently available for CC3+ but as the Annuals and other add-ons are updated you can continue to follow this process to add them via Run Command in your Campaign Cartographer Plus bottle.
Tips and Tricks
Locating CC3+ Files in Crossover
Finding the CC3+ files in your Finder can be tricky, and at first finding your designs can be frustrating if you don’t know where to look.
To find your files in Crossover:
– Open Finder and go to the View menu at the top of your screen. Select the Show View Options menu item. Make sure to check the Show Library Folder check box.
– Under your user folder, select Library > Application Support > Crossover > Bottles > CC3Plus > drive c > users > Public > Application Data > Profantasy > CC3Plus. Notice the files appear in that folder.
Moving the CC3Plus Folder for Easy Access
 – After you’ve located your CC3Plus folder I suggest dragging it into your Favorites menu on the left side of the Finder. That way the CC3Plus folder will always be accessible with a single click.
I also keep a My Designs folder under Documents. I save my maps to this folder rather than the CC3Plus folder within Crossover, just so I have easier access to my maps—especially the ones I save as JPG or PNG files and wish to share or upload.
 In the Dock
You can add CC3+ to your dock like other Mac applications by simply dragging its icon down into the dock.
 Renaming the Program
If you install Campaign Cartographer and forget to rename it, you can fix this by selecting the gear icon at the bottom of the Crossover screen and clicking the Rename menu option. You’ll notice that your program icons suddenly vanish. To restore them, select the Configure menu option at the top of your screen and select Clear and Rebuild Programs and choose the option to rebuild them. The icons should reappear in your menu.
 Thanks
Special thanks to Ryan Sturt, Rob Heath, and Ralf Schemmann—the true pioneers—for advice, education, and input on how to successfully run Campaign Cartographer on the Mac.
Bio
Steve Townshend is a freelance writer who has worked for several game companies including Wizards of the Coast, Paizo, Pelgrane, and Sasquatch. Recent design work includes Dungeons & Dragons 5e (Monster Manual, Dungeon Master’s Guide), and Princes of the Apocalypse for Sasquatch Studios. Here are a few of my maps.
5 Comments
ralf | April 14, 2015 | Tutorial, user tutorials
 Have you ever wondered how to create a cut-out in a CC3 polygon (a hole that allows you to see the entities underneath)? Ever struggled with using that most arcane type of entities: Multipolies?
Wonder and struggle no longer, Master Mapper Joachim de Ravenbel has written a new tutorial on the topic, which will teach you anything you need to know. On 15 pages he shows you the basics about the Multipoly entity, as well as full bag of tricks to make the most use of them. Thanks, for another great resource!
Comments Off on Multipolys – A Tutorial by Joachim de Ravenbel
Simon Rogers | March 10, 2015 | CC3 Plus, Tutorial
[Ed’s note: this great tutorial introducing editing was written by new CC3+ user R A Jacobs who is on a mission to learn CC3+ – follow his journey here. It features the first map by another brand new CC3+ user Kalthorine. See his original post on the forum.]
 Before We Start…
Selecting something on a screen by pointing and clicking is a very common activity that you probably do hundreds of times a day on a computer. When you think about it, it’s like picking things up with your fingers. You move the mouse to the icon that you want to open, or move, or delete; you select it by clicking on it and then you do some action. Modern User Experience Designers have made selecting objects on a screen very easy; often times, you only need to click within the vicinity of an object in order to select it.
And, what I learned this weekend, is that that is one of the reasons why you fail when you try to do just about anything in Campaign Cartographer.
Whaaaaaat?
Before you learn to do anything in Campaign Cartographer, you have to remember a few things:
- This is professional software. While some people report having no problems at all picking up the tool, for most, there is a learning curve; you have to both unlearn old habits and pick up new ones. In some cases, there is a level of precision that is required in order to accomplish a task.
- This is CAD software. As I’ve learned, CAD software works opposite of the way you are probably used to working with most desktop applications (at least on Windows). Instead of selecting something on the screen and choosing what to do with it (noun->verb: “This mountain, delete”), CAD software asks you to tell it what you want to do and to what objects you’d like to do it (verb->noun: “Delete this mountain”). The advantage of this approach is that you can execute the same action over and over quickly.
- Watch the Command Line (CC3) at the bottom of your screen. The Command Line is how CC3 communicates with you and provides hints on what you need to do next. CC3+ adds a new feature called a Command Prompt that provides more detailed instructions which float near the tip of your pointer to reduce the chance that you’ll miss them. A great feature when you are learning this tool!
- An entity is an element, object, symbol, line, whatever on the map. Anything drawn in the Drawing Window is an entity. Keep that in mind.
Overview
 For this post, I’m going to use the Khalkaeareon map created and posted by Kalthorine to the ProFantasy Community Forums. Be sure to grab the map, not just the image of the map.
There are many ways to select something on a map in Campaign Cartographer 3+. I tend to think of these options in terms of “Fundamental” and “Advanced” techniques.
Over the next two posts, we are going to look at what I consider to be the “Fundamental” select techniques. Part 1, today’s post, will cover:
In Part 2, we will take on:
At some point in the future, we’ll cover the following “Advanced” techniques. I haven’t yet had a lot of reason to experiment with these so I want to better understand the mapping situations best solved by these tools:
- Select by Color
- Select by Line/Fill Style
- And, Or, Not: Adding to or removing from a group of selected entities
Let’s get started…
Select All
Why You May Want To Use This Approach: You want to keep the template, tools, etc. that you have created for a particular map but you want to start the entire map over from scratch. In more advanced cases, you want to keep everything on two or more layers but get rid of everything else.
By far one of the easiest ways to select entities in Campaign Cartographer is to just select all of them. For now, let’s just assume you want to erase everything on a map and start over – but you don’t want to pick a new template or anything like that.
- Click the “Erase” button from the”Edit” toolbox to the left of the Symbol Catalog.

- Move your cursor to the Drawing Window. In CC3, take note of the Command Line, it reads “Select Entities (0 picked):”. In CC3+, you get this same text on both the Command Line and Command Prompt.
- Right-click. Select “All” from the pop-up menu.
 Every entity on the map is selected. The invisible outlines are presented in pink so you can see what you have selected.
- Right-click. Select “Do it” to execute the “Erase” command (or whatever command you selected).
The goal of this tutorial is not to teach you how to erase entities, just select them. We’ll leave it there.
Select by Layer
 Why You May Want To Use This Approach: You want to move everything on a single layer to a different layer; you want to erase everything on a single layer.
Next to Select All, selecting everything on a layer is easiest.
Over the weekend – you know, when I supposed to be making maps not learning about “Select” – Select by Layer came in handy.
I was following the Campaign Cartographer 3+ User Guide Tutorial on “Converting Your Old Maps” (pp. 84-86) and I kept getting stuck on Step 6. By Step 6, you’ve loaded up and scaled a bitmap or PNG image of your old maps when you discover that your old map is just a bit smaller than what you want your new map to be so you’ve got to move and scale the old map. You are going to do this by first aligning the inside corners of the two maps. To do this, you need to select edge of the bitmap (“With the crosshairs, click in the lower left corner of the old map.”).
I could not get it done1. It. was. so. frustrating.
It is, in fact, my inability to select a bitmap that led to the creation of this post. Since the bitmap was on its own layer, a very simple way to have accomplished this would have been to Select by Layer.
To illustrate a practical use of this Select approach, let’s say you want to move everything from the MINERALS/MOUNTAINS layer to another. To make a change like that, the tool you want to use is the “Change Properties” tool.
- Click the “Change Properties” button from the”Edit” toolbox to the left of the Symbol Catalog. If you look at Figure 1, above, it is the button immediately to the right of the Erase button.
- Move your cursor to the Drawing Window. In CC3, take note of the Command Line, it reads “Select Entities (0 picked):”. In CC3+, you get this same text on the Command Line and, additionally, in the Command Prompt along with more detailed instructions. See Figure 2, above. It will be similar.
- Right-click. Select “Layer” from the pop-up menu.
- Right-click. The “Select Layer” Dialog window will pop-up. Click the furthest left box on the MINERALS/MOUNTAINS row and click “OK”.
- Alternatively, if you know the name of the Layer you want to select, you could just type its name.
- In CC3, you type the Layer name on the Command Line
- In CC3+, as you type, the Layer name will appear in the floating instruction text near your pointer and on the Command Prompt.
- Every entity on the Layer is selected. You can verify this two ways. First, the invisible outlines are presented in pink so you can see what you have selected, just like in Figure 3, above. Second, the Command Line reads “Select entities (287 picked):”. If you have CC3+, the floating Command Prompt reads “Select entities to change properties [287 selected]:”
- Right-click. Select “Do it” to execute the “Change Properties” command or whatever command you selected.
Once again, we aren’t really learning about moving entities between layers so we are going to leave off at this point and move on to the next task.
Select by Window
Why You May Want To Use This Approach: You want to select more than one entity within a specific area of your map in order to move the group to another area of the map. You want to select a tight grouping of related objects and change their properties. You want to select a tight grouping of related objects and delete them. Lots more.
Select All and Select by Layer are very ham-fisted tools. They select a lot of entities without a lot of finesse. They have their place but, most of the time, you are going to want to work with a few entities at a time.
To start to get finer control over what you select, you can actually define a Window to select multiple items within an area at the same time. To use this technique, you select two points on opposite corners of an imaginary rectangle (“Window”). Everything inside the window is selected.
For this select exercise, let us assume that we want to move a the cluster of towers from near Drakenhold in the Upper Left Corner of the Khalkaraeon map.
 Click the “Move” button from the”Edit” toolbox to the left of the Symbol Catalog. See Figure 4.
- Move your cursor to the Drawing Window. In CC3, take note of the Command Line, it reads “Select Entities (0 picked):”. In CC3+, you get this same text on the Command Line and, additionally, in the Command Prompt along with more detailed instructions. See Figure 2, above. It will be similar.
- Right-click. Select “Window” from the pop-up menu.
- You are now going to define a “box”. Pick some point to the upper left of the group of entities you want to select and click.
- Pick a point to the lower right of the group of entities to select. As you move your cursor down and to the left, a “box” will grow around the group of entities you want to select. When the box surrounds the entities you want to select, click again.
- Every entity intersected by the box will be selected and will either turn pink or be surrounded by a pink border. See Figure 5.
- Right-click. Select “Do it” to execute the “Move” command or whatever command you selected.
 There are some gotchas that go along with this approach. This approach works on the concept of “intersection”. Any entities that fall within the boundaries of the Window you define are going to be selected. Because symbols frequently overlap, there is a good chance that you may pick up entities that you did not intend. In Figure 5, I was trying to select just the three towers towards the middle of the image. I got a lot more than I wanted.
So what can you do? Here are a few ideas:
- Reserve this approach for areas of the map where there are not a lot of overlapping symbols or other entities.
- Zoom-in close and use very small Windows to limit how many symbols potentially overlap your window.
- Deselect the entities you did not intend to grab.
- Freeze the layers containing the entities you do not want to select.
Select by Clicking the Edge of an Entity
Why You May Want To Use This Approach: You want to execute a command on one entity – most likely to delete or move it. You want to execute a command on a few entities from among a group of entities – most likely to delete or to move them.
Now we are zeroing in on it. You want to select a single entity and execute a command on that entity. To do this, you have to click on the edge of the entity. Ah…but that’s the rub: Where is the edge of the entity? You keep clicking the symbol you want to select and all you get is a cross-hair and you wonder, why can’t I pick up this symbol?!
If you look at either Figure 3 or Figure 5 above, you will see a pink colored box around the entities that are selected. This is not the edge of the entity. Let’s call this the “border”.
If you look at any sufficiently styled symbol, you will find a lot of edges within the icon. Again, this is not the edge of the entity. Let’s call these the “lines” that define the symbol. The edge of an entity is a line.
The core problem is that you expect Campaign Cartographer to work like your Windows machine. In Windows, you click in the center of an icon on the screen to use it. That’s not how it works in Campaign Cartographer (remember those habits I said you needed to unlearn in the Overview, above? Yeah. This is one of them.)
The edge of the entity is defined by the outer lines of the symbol regardless of where the border of the entity may be. To select by clicking the “edge of an entity” you must click the outer lines of the entity. Clicking a line/edge in the middle of the entity will not select the entity.
In my (albeit limited) experience, it is much easier to select a single entity by working up close. For this particular select exercise, let’s us assume that you want to move Drakenhold castle in the Upper Left corner of the Khalkaraeon map.
 Find Drakenhold castle on the map. It is in the Upper Left corner of the map.
- Zoom in. You can do this from the View -> Zooms -> In By 2 menu item, the Zoom buttons on the upper far right toolbar, or by right-clicking and choosing one of the Zoom options. Get in close. See Figure 6.
- Click the “Move” button (see Figure 4, above, if you are not sure where the button is).
- Move your cursor to the edge of the castle and click. The symbol or entity should either turn pink or be surrounded by a pink border. See Figure 7.
- Look at the Command Line and Command Prompt (if you are using CC3+). The Command Line should read “Selected Entities (1 picked):”. The Command Prompt should read “Select Entities to Move, Scale, Rotate [1 picked]:”.
- If you want to add more entities to the group, repeat Steps 1-5 until you’ve selected all the entities you want to manipulate. Keep an eye on the Command Line / Command Prompt to ensure that you are only picking up the entities you expect to pick up.

- When you are done selecting individual entities, right-click and select “Do It” to execute the “Move” command or whatever command you chose.
In Step 5, if the “Selected Entities” count is 0 or greater than 1, you’ve either failed to select the castle or you picked up something in addition. You need to deselect and try again.
Deselect an Entity
Why You May Want To Use This Approach: Using another approach, you’ve selected one or more entities that you did not intend to select. Before you complete your command sequence, you need to reduce the number of entities selected.
As you seek finer and finer control over the number of entities you want to select, you are going to select entities that you did not intend to select. Before you right-click and select “Do it”, you need to clean up the collection of selected entities.
First, double-check the Command Line and the Command Prompt to see how many entities are currently picked. If you think you’ve got 1 but the command line says you’ve got more, you’ve got clean-up to do.
There are two basic ways to deselect an entity. You can choose to cancel the command or deselect entities one at a time.
Cancel the Command
- Complete Steps 1-6 of Select by Window but only try to select a few entities.
- Right-click and select “Cancel” from the pop-up menu.
- The items are no longer selected.
 But wait! If the items are no longer selected, why are they still surrounded by a pink border? To save resources, the Drawing Window does not refresh after every command. If you still see pink borders, click the Redraw button to the upper right (see Figure 8), use View > Redraw or type CTRL-R. If the pink border does not go away, then you did not deselect the entity.
Deselect Entities One At A Time
- Complete Steps 1-6 of Select by Clicking the Edge of an Entity. Select 3 entities.
- With three entities selected, press and hold the CTRL key while you select one of the 3 entities you just selected.
- The Command Line count of Selected Entities should decrease by 1.
In general, any time something doesn’t quite look right on the map, it is probably a good idea to “Redraw”. To clean up my drawing left-overs, I find myself doing this frequently after deselecting entities and executing other commands.
My gut tells me that if I want to get good at Campaign Cartographer – to really master it – I need to spend time really learning these fundamental skills. Just from playing around with these techniques and then writing them down for your benefit has been extremely helpful to me.
How about you? Did any of this help? Do you have a trick for selecting objects within CC3 that gets you out of tricky situations? What is it? Leave a comment and tell me about it.
1 Comment
ralf | February 2, 2015 | CC3, Tutorial, user tutorials
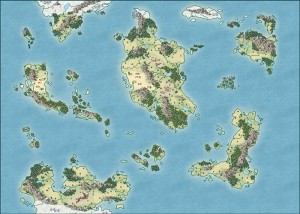 CC3+ is only a few days out and we already have the first user tutorial on the community forum. Malmo3000 modified the new Mike Schley Overland style to create his Skalderand map depicted on the right, and explains his process in this tutorial. Here’s what he has to say:
I recently started drawing with CC3/CC3+. Despite other comments I've read in multiple forums the learning curve wasn't a big deal for me as beginner. In my opinion the most challenging part is to find a way of mapping and thus creating a "own" style that suits you the best. As some of you noticed already in my thread called "Skalderand [CC3+]" I've found my personal "style" of mapping. So I wrote a little step-to-step tutorial for myself to produce multiple maps within CC3+ with a consistent look. In here I use mostly basic stuff and nothing fancy so with the help of the manual you shouldn't have any trouble of following. I really hope this will help other beginners to CC3+ when coming up with their personal style.
Download Malmo3000’s Campaign Cartographer 3+ Tutorial
Comments Off on First User Tutorial for CC3+
ralf | February 2, 2015 | Annual, Lighting, Tutorial
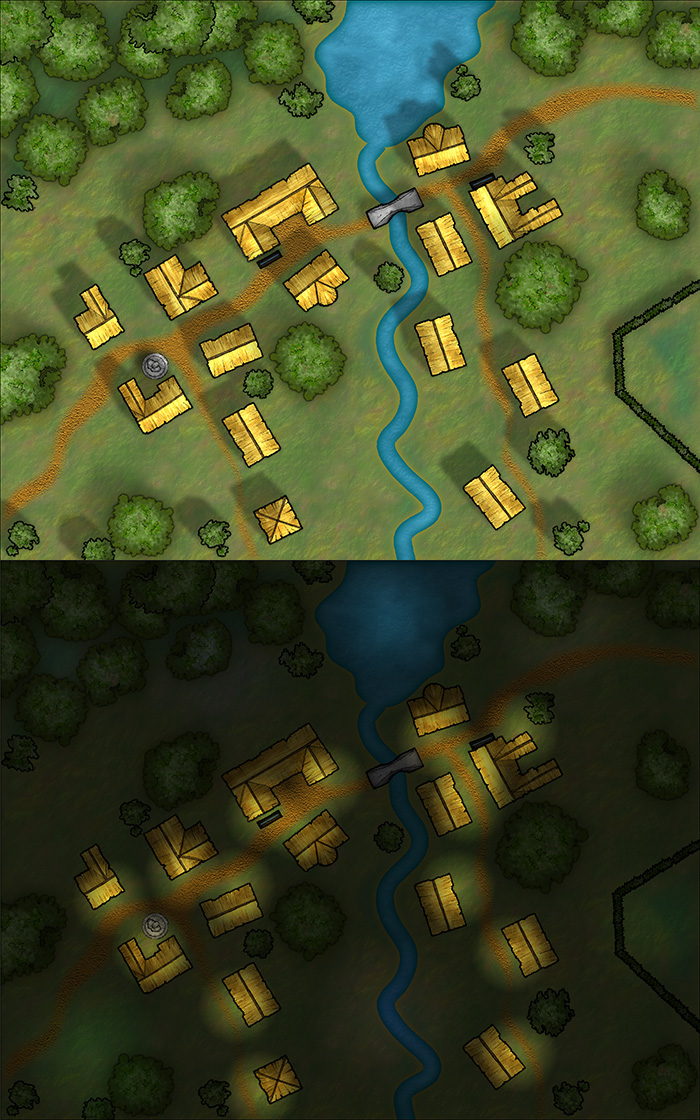
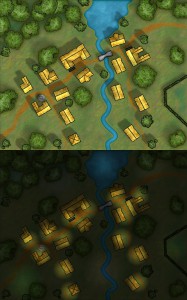 It’s easy to overlook the small things, with the big release of CC3+ last week, but we should not forget it’s a new month and a new Annual issue is available: The Tutorial Pack – Day and Night. If you are a subscriber, you can download it from your registration page.
This tutorial takes an in-depth look at creating differently lighted environments, for example if you want to show a combat encounter area in both daytime and nighttime conditions.
If you haven’t subscribed to the Annual 2015 yet, you can do so here.
Note on CC3+: For now this Annual issue is done for CC3, as the CD3 and DD3 add-ons are not updated for use in CC3+ yet. Starting next month, we’ll make the Annual issues available in both CC3 and CC3+ versions.
Comments Off on Cartographer’s Annual 2015: February Issue
ralf | November 17, 2014 | Dungeons, overland maps, Tutorial, Video
We’ve started a new series of short video tutorials for Campaign Cartographer 3 and its add-ons. These are meant to be small tidbits of useful information we (or anyone else for that matter) can point to when asked about the tool or method in question. Check out the first two:
Drawing a semi-circular room in Dungeon Designer 3:
DD3 Semi-circular Room from ProFantasy Software on Vimeo.
Editing a landmass drawn with the default CC3 tool:
CC3 Editing Landmasses from ProFantasy Software on Vimeo.
As this is a new series for us, we’d like your feedback and your suggestions on what topics to cover. Post them here in the comments or over on the community forum.
You can subscribe to us on Vimeo or use our YouTube channel to follow these videos.
1 Comment
ralf | November 14, 2014 | Tutorial, user tutorials, Video
We’ve recently stumbled across this wonderful little video tutorial by Jason Hibdon (Eugee on the community forum). Jason creates a quick battle map for a virtual tabletop game, using the free “Jon Roberts Dungeon” style from the Cartographer’s Annual.
You can download the free Annual issue here.
Comments Off on Dungeon Designer 3 Battle Map Tutorial
ralf | February 19, 2014 | ca3, character artist, guide, Tutorial
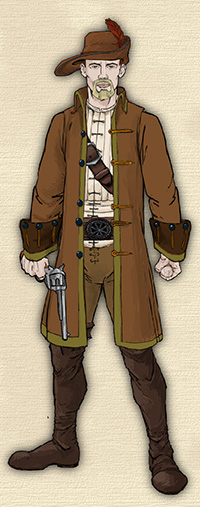 As many symbols as Character Artist 3 contains or how many we may add in the future, the incredible variety of role-playing games, settings and campaigns means there will always be need and room for more.
The obvious – but not always simple – solution to needed symbols is to create them yourselves, either by drawing them from scratch or adapting existing artwork to your own requirements. Because the Character Artist 3 catalogs and symbols have a pretty specific setup, we are offering this guide to their creation. It takes you through the steps of adjusting existing png artwork for use in CA3 and importing it as a symbol.
Download CA3 Symbol Creation Guide mini-installer (contains pdf and support files)
Download CA3 Symbol Creation Guide pdf
1 Comment
ralf | August 6, 2013 | Annual, scifi, star system, storyweaver, Tutorial
Joe has been so kind to create a video tutorial to go with this month’s Annual issue (High Space System Maps). Way to go, Joe!
Comments Off on Video Tutorial for August Annual
 Scorching desert, scouring dust storms and bleak landscapes are the daily lot of your adventuring party? Cruel magic has stripped most life from the surface of your world? This month’s Scorching Sun drawing style by TJ Vandel will let you map this kind of landscape in beautiful detail. Click the image on the right to see a high-detail version of the included example map.