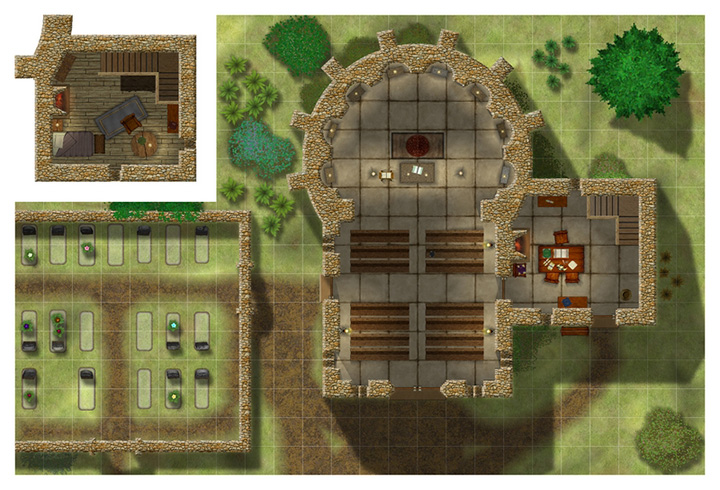
Master Mapper Jean-Michel Bravo (known as Joachim de Ravenbel on the ProFantasy forum) has created an amazing series of tutorials for the CC3 community. Step-by-step he goes through the creation of his floorplan of “The Chapel” highlighting lots of useful techniques and commands on the way. This is a must read for any serious user of Campaign Cartographer 3.
Here’s an update with three more videos in the series.
Overall these first 5 parts cover creating your own symbols and catalog for old-school mapping, which of course is helpful for any project where you need your own custom symbols.
Comments Off on Old School Dungeon Mapping with Joe Sweeney – Part 3 to 5
Joe Sweeney has started a new series of mapping tutorials, this time on old school dungeon maps. As always, there’s tons of things about CC3 (and Dungeon Designer) you can learn from his videos!
So far two parts of the series have been released:
[Ed’s Note: Let us know if you like this style, and with Flavio’s permission, we’ll create an Annual from it]
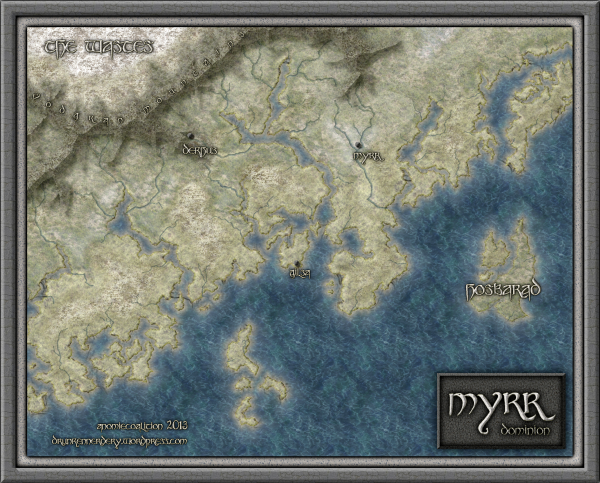
My fiancée recently asked me if it would be OK to make a Viking character for my Al-Qadim campaign. I thought about the role playing possibilities for a moment: Viking gets lost at sea en route to pillage and plunder; Viking gets shipwrecked in hostile desert environment; Viking PC makes for a very interest game indeed. I then thought about where such a Viking would come from in my world and set about creating a map of his home.
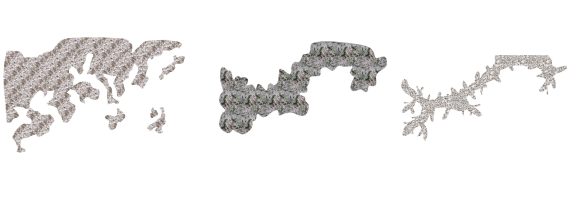
Myrr is a semi-arctic region largely inspired by Scandinavia, Iceland, and Alaska. I spent a great deal of time looking over maps of their fjords and river systems in the hope that I could create something similar and believable in my own map. After an hour or two tinkering around with the fractal line tool (adding a river here, indenting land mass there, etc), I finally had a landmass and set of islands I could be happy with.
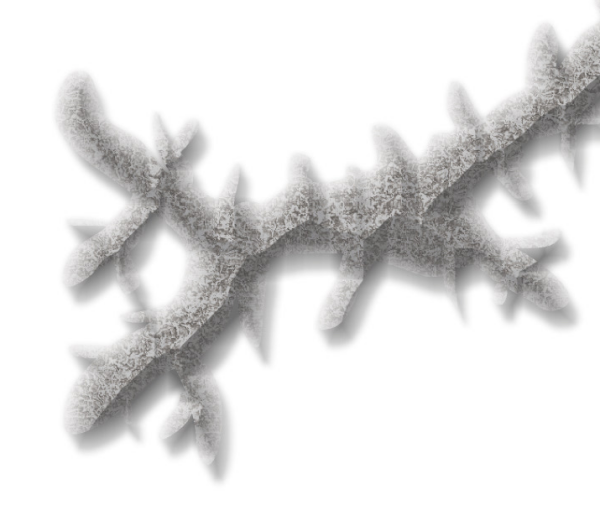
The next step was to create the mountain range. I first drew the main ridge of the mountain and all the little ridges that branch off of it with the smooth poly tool. This is what the looked like without effects on.
I gave it a rather long and dark wall shadow, a deep edge fade inner (with 75% inner opacity), and a large lighted bevel effect (so that the two sides of the bevel met in the center of the polygon). I then added a Mountain Hills sheet that encircled the range with a smaller edge fade inner and lighted bevel effect. Next, I added a Mountain Base sheet that encircled the Mountain Hills (also with a smaller edge fade inner and lighted bevel effect.) Because I wasn’t thoroughly happy with the colors that were coming out, I finalized it with a Mountain Cover sheet. This shows the details of the effects:
And this is the final mountain range:
As you can see, I also used the Mountain Base sheet to layout my hills. I further added a Hills Base sheet that encircle these hills and had a deep edge fade inner to give the illusion of height. From there I added some forests (very subtle), rivers, text, (about a dozen assorted sheets to get the ocean, landmass and desert looking right) and called it a day. All of the textures came from Herwin Wielink annual and CGtextures.com.
This map was a great deal of fun to make and I learned a new technique for mountains in the process. Of course, the best part is now crafting a history about this region to help fill in the gaps of my fiancée’s character’s back-story. Although I’m far from done, you can check what I have so far (along with a full resolution version of the map) at my blog.
Joe Sweeney has posted a new video tutorial on his YouTube channel. While aimed at aligning side views and floor plans of starships, the technique can be used just as well for dungeons and buildings.
[Ed: Bill Roach is best known in the CC3 community for creating the free Terraformer enhancement to Fractal Terrains 3. Here he turns his attention to water courses; a features which is often added to maps without much thought.]
(Images in this article not created by the author are either courtesy of the EPA, FEMA, USGS, or NOAA, or are licensed as Public Domain, or under the GNU Open Document License by their respective authors.)
The rivers on your overland maps will be the life blood of your simulated world. Most of the plant and animal life on your maps will cluster next to them, near them, and around them. Settlements, towns, and cities will grow alongside them, and fishermen, hunters, trappers, farmers, and merchants will depend upon them for their livelihoods. They will act as major arteries of commerce, major zones of cooperation, and points of contentious, sometimes vicious geopolitical dispute. In peace they will be places of celebration – and in war, they will be places of intrigue. They will be signposts for travelers, and form the borders of nations. They may even be the focus of religious pilgrimage. They will be some of the most important and essential key elements of your maps.
When you design your overland maps, also remember that your riverways, lakes, and seas will influence weather.Agriculture depends upon rain – and farms are typically found in water rich places. Rivers and lakes mean farms, farms lead to hamlets, villages, and towns, towns give rise to cities, and cities give rise to nations.
This is the second part in my overland mapping tutorial. If you want to read the first part before continuing you can find it here. As usual this is my view of mapping and you might agree to it all or just parts of it. The important thing to remember is that this is one view of mapping, and not the only one.
Ok back to the map. We have some landmass, islands and seas so what’s next. At this stage I always try to place mountains and hills. If you desire you can try to work out where you would have tectonic plates and from that information decide where to put the mountains. I never do that, I’m more going for the “if it looks good it looks correct” path here.
First of all I often try to use my mountains to divide the landmass into different areas. It is an easy way of making natural borders in the map that you later can use when it is time to decide where to put the borders between different countries.
Secondly I try to make my mountain chains curved. If you make them straight the map will, in my opinion, look a bit stiff, which will give you a less good looking end result. When I say curved I don’t mean that they should look like circles. Curved mountain chains will give more life to the map, it will get more fun to look at.
Also try to break up the mountain chains at some points. It will give you some interesting valleys and passes that can trigger the beholders imagination in a good way. Is there really a more interesting place for a campaign then a mountain valley full of orcs or strange creatures, maybe a deserted watch tower or an old haunted burial ground.
Around the mountains I place some hills to make the transition from mountain to field look more natural. A good idea might also be to put some hills between two mountain areas that are quite close to each other. It will connect them in a nice way.
When you’re done with your mountains it is time to start on the rivers. The basics when it comes to rivers are that they flow from high ground downwards, they don’t split downwards, but they can have more than one starting point. Usually they also try to get to the sea the shortest downhill way. If you try to follow those two rules the rivers will look more naturally.
Another thing to think of is that the straighter the river is the faster the flow of the river will be. Most rivers tend to be straighter and faster in the beginning and closer to the sea they usually will slow down, which means more curves. When I put rivers in my maps I tend to do them quite curvy. It will usually look better, straight rivers just don’t get the right feeling, at least that’s my opinion.
The upcoming July Annual contains a host of new bitmap artwork, hundreds of new textures and symbols for your starship floorplans. They will be released on Sunday for the Annual subscribers.
But perhaps best of all, they are accompanied by a series of new video tutorials by the master of CC3 videos, Joseph Sweeney. These videos are freely available to anyone, and you can already view them on Joe’s YouTube channel or download them from the July Annual page.
Comments Off on July Annual comes with free video tutorials by Joseph Sweeney
Joseph Sweeney has posted a couple new video tutorials on his YouTube channel. These cover some more advanced techniques like creating your own symbol catalogs from PNG bitmap files and adding new catalog settings to your buttons in CC3.
This time I thought it was time to make a tutorial on how you can make a convincing overland map. This will be more of an overview tutorial on how I think and plan when I make a map, so it won’t be very technical. This means that you can use this tutorial regardless what program you use when you map, even though I in the tutorial will use a map made in CC3 as a reference and example.
The first thing to take into account when you start an overland map is the landmass. How much of the map will be water and how much will be actual land? This is probably the most important step in your map because it will set the boundaries for what the end result will be. So already here I’m having a quite clear view of where I want to go with the map, shall the map be land based, island based or something in between.
Below you see my map “Sagorike”, that I’m using as an example in this tutorial, with only the landmass viewable. I’ve also written some things on the map that you can have in mind while drawing the coastline.
A good thing to do before starting on your landmass is to look at the real world (Google earth is great for this). If you want a lot of fjords, have a look at Norway, Island based, look at area outside Stockholm for example, and so on. It is always good to find inspiration in the real world. It will make your map look more believable, and believable maps tend to look good.
However when I make maps of worlds the most important thing for me is that they look good and in some part convincing. It doesn’t matter if the world doesn’t work geologically or physically, as long as it looks convincing. To make it look convincing you have to get the things right that the majority of people can spot, like rivers, they will NEVER split downwards, lakes, there is always only ONE outflow, or deserts, make sure that you place them in a way that it looks probable that no rain will get there, and so on. If those small details are correct it is more likely that the viewer will believe in the whole map, regardless if everything in it is possible according to our physical laws or not.
That is all for now, in the next post we will start by placing the mountains in the map.