ProFantasy Software will be on stand 1715 at GenCon, and we’ll have a brand new release – Fractal Terrains 3! It’s powerful, robust and fully compatible with CC3’s effects.

An example export, with cloud cover:

ProFantasy Software will be on stand 1715 at GenCon, and we’ll have a brand new release – Fractal Terrains 3! It’s powerful, robust and fully compatible with CC3’s effects.
An example export, with cloud cover:

Scrying Eye are also in the RPG cartography business, but they provide the end result, not the tools to do the job! Recently, they’ve used our Cosmographer 3 software to create detailed miniature-scale deckplans under license for Mongoose Traveller. James Miller of Scrying Eye talks about Cosmographer 3 and his deckplans at about 5:20 in the video below:

In this, the fourth part of our series on mapping cities, we will spend time setting up a district using Campaign Cartographer 3 (CC3). We will be using the City Designer 3 (CD3) add-on because it makes the job of mapping cities much easier. But pretty much everything we do in this tutorial can be accomplished with the based program – it’s just more work, and your style and building options are fewer.
When we get to the step of mapping individual buildings, you’ll definitely want to have a copy of CD3 because the end result is so much better.
We are going to rough out the entertainment district of our map (the red district just above center):

My original city map was created in an old version of CC3, so we’re going to copy the district and put it in a new map. Continue reading »
This month’s Annual issue on paper modeling is not the first time I’ve messed with Dioramas Pro, paper, glue and a trusty hobby knife.

Whitewash City and Cardstock Cowboys

Mexican Fort in Perspectives Pro
Dioramas Pro then came to my mind and I asked myself, why I shouldn’t be able to design and build a few mexican-style buildings myself. They’d not come out as marvelous as the Whitewash City models, but probably good enough for ourselves. So I fired up CC3, loaded a Dioramas Pro template for the first time in quite some time and set about designing my own models.

Construction Sheet for Gatehouse
We had a blast in the two game sessions our posse stormed that fort and successfully freed the captive. The time I spent on building the model is of course way beyond what you’d normally spend on preparing one or two game sessions, but I had a blast and learned lots about paper-modeling (and Dioramas Pro) in the process. The fort even served as a display piece at Spiel’10 in Essen. And here it is on all its glory:

More images of the fort and other props of our Deadlands campaign can be found in my online gallery.
 Forum member Nicholas Hopkins created an atmospheric floorplan for a Call of Cthulhu game. Download the PDF.
He says:
I saw a couple of floorplans in some older mission sourcebooks for Call of Cthulhu and wanted to emulate it as much as possible. I am doing a 1920’s campaign so I wanted it to look a little old fashioned, hence the black and white. It is based on the lighted dungeon template so that the shadows fall the right direction and it gives the rooms a little more texture as there are small, subtle shadows towards the corners of the rooms.
I used the Sepia setting under the RGB Matrix effect and it worked very nicely. Because I didn’t want a background of solid black (never seems to print well) I put in a couple of light sources outside the walls to light things slightly and cast some shadows off the corners of the building. There was some odd effects with the light sources associated with doors and windows so I just made a new sheet called Window Block, made sure that things on it blocked the light sources and was below the Wall sheet so it would disappear, and drew a simple line across the openings. Took care of things nicely. The symbols are a mixture of DD3 symbols and SS3 Modern symbols. They all came out nice looking with the effects turned on.
In the previous two installments of this series, we determined where a city is likely to arise, and did some basic planning for a city (read Mapping Cities Part One here and Part Two here). In this installment we will plan out a district in more detail.
There are four things to keep in mind when thinking about the structure of the district:
Affecting all four of these mapping factors is the question of age: As districts age, they change and deviate from plans, space is filled in, walls are torn down, roads and squares infill. A fundamental right for city dwellers was the right to own land, and new cities are laid out in standard-sized burgage plots. The size of these plots vary from city to city, but are uniform within the city: Typically 10-20 meters wide facing the street, and 50-100 meters deep when first laid out.
The plots are large enough for outbuildings, keeping animals and small gardens. But as space pressure increases, the plots are subdivided and filled in. Usually the divisions stay within single plots, but the example below shows two plots that were split up together.

Over time city plots are filled and subdivided
As you lay out plots, you need to make sure that every building has access of some sort to the road, even if it is through an alley. In the example I give above, the grey areas are alleys. As you have ideas for points of interest, add them now or make notes for later.
I occasionally cheat and put in plot divisions that are not road-accessible. I just know that they will need a passageway through another building (maybe an arched gateway) or they need to be abandoned buildings that I can use later in my campaign.
Next time, I will show you how to apply these rules in Campaign Cartographer, using an entertainment district of my city.
The City Mapping Series
Part 1: Location, Location, Location
Part 2: Urban Planning
Part 3: Laying out Districts
Part 4: Districts in CC3
Part 5: Sizing Buildings
Part 6: Filling Blocks in CC3
Part 7: Houses Galore!
Part 8: Outside the Gates
 CC3 can be put to many uses apart from mapping, especially if you take some of the more specialized add-ons into the mix.
Several years ago (lots actually), when I was into naval miniature games but lacked the funds to collect pewter miniatures on a larger scale, I resorted to scratch-building ships from sturdy paper, toothpicks and paper-clips. The design process was laborious and I had to keep the little paper parts around for future rebuilds of the models.
Continue reading »
This map of Shadow World was created by Matt Hanson from the Cartographer’s Annual Vol 3..
I started creating a map of the continent of Jaiman on Shadow World® to include in an upcoming Player Guide. I wanted to create a comprehensive map that included all map related layers of data in all the official books: Places of Interest for players and GM’s, Essaence Flows, Climate, Navigator Obelisks, Roads, Cities & Towns, Kingdom borders in different time periods. However the base map was on the continent scale so I felt the “Fantasy Worlds” style from the April ’09 Annual would work best and give a nice simple and clean look.
I made a few changes to the standard Fantasy Worlds style. Given that the entire continent (45 to 70 degrees latitude) would be covered in forest I felt that the obvious borders in the standard forest (that uses a tree symbol fill) didn’t make much sense. Instead I changed the color of the default land fill to make it a darker and more saturated green. I also created two additional bitmap fills – one darker and greener, and one lighter and more yellow. I scattered a handful of polygons about using these fills to give further variation in the landmass, representing denser than average forest, and more sparse forest mixed with grassland.
Jaiman Map Copyright Matt Hanson 2009, based on Terry Amthor’s Shadow World setting , now published through Guild Companion Publications. Shadow World® is a registered trademark of Terry K. Amtho. This map will be available in final form in the upcoming Shadow World® Player’s Guides series.

Our Annuals are designed to give value year after year – as an example, I give this flashback to May 2008 from my livejournal…
Many of us remember, and were inspired by Pete Fenlon’s wonderful maps for the Middle Earth Roleplaying Game. Today, Pete is Chairman and Studio Director at Mayfair Games. In January 2008, with Pete’s permission we released a style pack for making maps in his style as part of the Cartographer’s Annual 2008.
Steve Townshend produced this beautiful map in the Pete Fenlon style.

It uses only specially designed vector symbols combined with CC3’s effects to get the right look.
Style packs are preconfigured so that if you select a tool (for example, rivers, roads and terrain), it looks right for the map style. To create a forest, you just select the forest draw tool, click points for the border, and it does this, adding random tree tops and edge trees.

You building up mountain ranges by selecting a symbol, then placing. They are selected randomly from a collection of symbols. So this was one click per mountain, and the mess at the bottom is a mountain cursor. You can tab through random styles if you don’t like the current mountain at the cursor.

The distinctive ridges are also built up of symbols. On the left, with CC3 effects off, on the right, with them on.


Although the styles definitely make it easier to create maps such as these, Steve Townshend demonstrates that the human touch is still required to get an aesthetically pleasing map – style packs just make it easier to get the desired effect.
You can download the map in CC3 format here.
Hi everyone!
I am Eric hanuise, from Flatlined Games.
In the beginning of this year, I published Dragon Rage, a game by Lewis Pulsipher, author of Britannia.
This release would not have been possible without the use of Campaign cartographer 3, City Designer 3 and the symbol sets.
Dragon Rage is an hex-and-counter wargame, that was first published in 1982 by Dwarfstar Heritage, a now long disappeared miniatures publisher.
When I licensed the game for republication with the author, I first tried to contact the original map artist, but without success.
I investigated several options to have the map re-created, and CC3/CD3 was THE solution to my woes.
Profantasy’s licensing agreement is a killer feature, there is no other map-making software on the market that allows commercial use of the software’s output, and has such high quality and consistent results.
Not only was I able to quickly recreate the original game board’s map with great precision, I was also able to create a second map to use on the board back, offering two games instead of just one!
Here is the original map, of Esirien, a walled city by the sea. in the game, the city is attacked by Dragons and other vile creatures, while humans defend it :

The combination of CD3 vector houses and bitmap symbols was just perfect to highlight the houses that serve as objectives in the game (with blue numbers).
The shading on the walls, trees and houses are on different heights and provide a realistic look to the map.
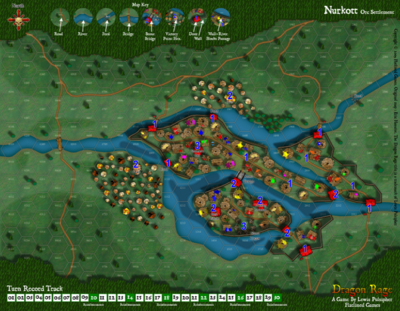
And here is the second map I created, Nurkott, an Orcish oppidum, attacked by Humans and various creatures :
You can learn more about Dragon Rage on the game page on our website .
We at Flatlined Games were so impressed by CC3 and CD3 that we placed a ‘mapped with Campaign cartographer’ logo on the box’s back 🙂