Remy Monsen | September 28, 2020 | cc3plus, styles, symbols
 In CC3+, each template is designed for a single style, which comes with it’s own symbols, fills and tools, while the resources belonging to other styles are not directly visible in the GUI.
This is intended behavior, because it puts the chosen style in focus. You know that all the elements you are being offered are designed to work with that style and fit with the visual design of the style. This behavior is both a blessing and a curse. Keeping the focus on the style is good. If you own everything, you’ll have about 40.000 different raster symbols (and a lot of vector symbols too, but I don’t have the count), you really don’t want to filter through all of these all the time when working on your map to find the ones matching your current map style, that’s just hugely impractical. But every now and then you want to be able to mix map styles, and you know of a couple of styles that work very well together. How can you easily access all the symbols from these styles?
Continue reading »
1 Comment
ralf | November 13, 2019 | Create New Style, overland maps, styles, Tutorial
This is part 3 of the “Creating a New Map Style” series of articles.
It’s been far too long since the last part of this article, so let’s hurry up and take on the next step in creating a custom style for CC3+. After setting up the template and adding new bitmap fills, we now need to look at the new symbols.
 1. Setting up new catalogs
The first step is to set up one or more new catalogs to hold the symbols. For this example, I’ll take the Worlds of Wonder style’s catalogs and create a copy under a new folder /Symbols/Maps/Worlds of Wonder BW/. I rename them to remove the CA145 (the Annual issue number).
I won’t go through the details of drawing or importing new symbols here, and for the example, I’ll just edit the existing Worlds Wonder symbols to be grayscale instead of coloured versions of themselves.
When that’s done let’s make sure the map loads one of these catalogs when it opens. Go to File > Drawing properties and open the map note “OnNewMap”. Basically this is a macro that gets executed when someone creates a new map from the wizard template. Change the line
“CATALOG @Symbols/Maps/Annual Worlds of Wonder/CA145 All.FSC”
to
“CATALOG @Symbols/Maps/Annual Worlds of Wonder BW/Mountains.FSC”
and do the same in the OnOpenMacro map note. This macro defines what happens if someone just opens a map based on the style.
 2. Creating Catalog Settings
One of the more obscure things to do when creating a new drawing style is to set up the catalog settings so the catalog buttons open the correct symbol catalogs for the style. To do so, click the All Drawing Tools button on the catalog toolbar and then the “Advanced” button on the dialog. The dialog should then look the one on the left here. It lists all the available catalog settings that match both the master filter and the setting filter. We will need to create a new master filter and the settings to match.
Deciding on a master filter, I will make it “WBW” (for Worlds of Wonder Black/White). I select each of the setting entries I want to duplicate in turn and create a new one based on the current one, where I replace the “CA145” with “WBW”. These will not appear in the list for now, as they don’t match the master filter.
 I then type in the new master filter “WBW, and the settings appear as shown on the right. All your new settings will show up. Go throguh them in turn and make sure they load the correct symbol catalog. You can also set the properties that get set when the respective button is pressed. That by default the overland catalog toolbar loads the following six settings: Border, Coast, Mountains, Natural, Structures and Vegetation. Everything else, like Cartouches have to be loaded through the All Catalog Settings button.
Now we need to set up the master filter itself, as so far we’ve only decided on its name. Right click the Symbol Style Toggle button on the left toolbar and choose “Master Filter Settings”. Rename Filter 1 to “WBW” and save the setting under the same name.
 Now we just need to tell the template to load the master filter on startup. As above, go to the OnOpenMacro and OnNewMacro map notes and change the line
“SYMICONFLOAD CA145”
to
“SYMICONFLOAD WBW”.
And that’s all for setting up the symbol catalogs for a style. Depending on how many new symbols and catalogs you create it can be quite a bit of work of course, but the basic procedure is always the same.
In the next article – which hopefully will not take quite as long to follow – we’ll look at setting up the drawing tools of the new style.

Comments Off on Creating a New Style Part 3 – Adding Symbols
ralf | June 28, 2019 | Create New Style, overland maps, styles, Tutorial
This is part 2 of the “Creating a New Map Style” series of articles.
After we have decided on a style to create last month, let’s take a look at creating the first new pieces of artwork. One of the defining aspects of a style are fill styles it uses.
 1. Creating new Bitmap Fills
Let’s take a look at the bitmap fills used in the World of Wonder style, which serves as the basis for our new style. Open the CC3+ program data folder in Windows Explorer: C:\ProgramData\ProFantasy\CC3Plus and find the subfolder /Bitmaps/Tiles/Overland/Annual Worlds of Wonder/. You’ll see that it includes 9 different fills, with at four different resolutions each.
 Create a new folder under /Bitmaps/Tiles/Overland/ called “Annual Worlds of Wonder BW”, then copy the VH resolution file of each fill over to the new folder. Remove the _VH part of all the file names. Now you can open up the individual files in a Bitmap editor (like Photoshop or Gimp to edit the textures. I’m doing some very simply operations here, converting the files to greyscale to match our idea of a black and white stlye, and I rotate some of them and/or apply a photo filter. Of course you can be as elaborate as you want, even creating complete new graphics, but for the purpose of this tutorial I’ll keep it simple.
 2. Importing the New Fills
Let’s get the new fills into our map template. TO do so, we need to start CC3+ and load our template /Templates/Overland Maps/Wizard/Annual Worlds of Wonder BW.FCT. The select Tools > Import bitmap fill styles from the menu.
The import bitmap fills dialog comes. “Browse” to our newly created source folder and select one of the files. Check the “Create other resolutions option and set “Scaled” to 1000.00 for both width and height. To differentiate the new bitmap fills from the old ones, change the “Suffix” to _BW (for our black and white style). Then click OK and let CC3+ do its work.
 3. Changing the Existing Fills
There are only a few entities in the template that use the old (coloured) fill styles, but even if there were more, it is easy to change them:
- Right-click the Change Properties button and choose Change Fill Style.
- Right-click on the map to select, then choose More > Fill Style.
- Right-click to bring up the fill style dialog and choose “CA145_Parchment” from the Bitmap Files tab. Click Ok.
- Right-click and choose Do It.
- Right-click to bring up the fill style dialog again and choose “CA145_Parchment_BW”. Click Ok.
You’ll see that the parchment border of the map has turned grey. You can now do the same for each of the existing fill styles, but for this map you really only need to do it for the CA145_Ocean fill, as that is the fill of the background rectangle.
The template now shows a greyscale version of the old one and that’s how we wanted it to be. Next time we’ll start of converting the symbols of the style into the new look.

1 Comment
ralf | May 28, 2019 | Create New Style, overland maps, styles, Tutorial
 While Campaign Cartographer offers a wide range of different drawing styles to use, sometimes you just want that special look that anybody else uses, and few things are more rewarding than creating your own unique mapping style. We have covered some of the process of doing this in the first Annual Volume, but quite a few features have been added to CC3+ since then and the Annual issue couldn’t cover all possible options in high detail.
So I thought that a publicly-available article series might be a good way to document the process step-by-step and in higher detail than an Annual issue can. It should also give everyone the opportunity to pitch in with questions along the way. So, let’s get started…
1. What map type to use?
The first decision to make is what type of map style we want to create. A city style? One for floorplans? I know what I’m going to do for this article, my favorite type of maps: an overland maps style.
 Let’s take a look at what styles are already available in CC3+. To do this you need to open the CC3+ program data folder in Windows Explorer: C:\ProgramData\ProFantasy\CC3Plus. If you installed CC3+ in a custom location, you will need open that folder. If you don’t see the ProgramData folder at all, it may be “hidden” in Windows 10. Make sure to activate the option “Show hidden files/folders” in Windows Explorer and it should appear.
Now navigate to the Templates subfolder, then Overland Maps, then Wizard. Here you see all the different overland wizard templates listed. Each template consists of three files: The CC3+ template (FCT extension), a preview bitmap (the PNG file) and a short text info file (TXT). For most of the file you will see two sets of 3 files, one for metric units and one for imperial ones. As the template forms the basis for a map style, we will need to create a new set.
2. Creating a New Wizard Template
 I find it easiest to start a new style based on an existing one. It might only be vaguely similar, but copying an existing style makes it easier to not forget necessary bits and pieces and gives you a set of styles to start from. That means we need to decide what style we want to create at this point. I am thinking January’s World’s of Wonder style would look good in black-and-white, so I decide to create such a style for this article. I locate the three files (for imperial units) in Explorer as shown on the right.
 Select the three files and use the clipboard to copy them (ctrl-c, then ctrl-v). Windows will rename these copies by appending “- copy” to the filename. Rename all three to the name of your new style (e.g. Annual Worlds of Wonder BW.*). Make sure the file names are all exactly the same, except for the file extension. We won’t worry about the metric version of the template yet – we can create that much later when most of the work is done.
3. A New Drawing Tool folder
 After the template, the next important part of a style is the set of drawing tools to go with it. Again, we can create a new one by copying an existing set. Navigate to the ProgramData\ProFantasy\CC3Plus folder again and then go to System\Drawtools\. You will see a folder for each drawing style. Again, create a copy of the folder “Annual Worlds of Wonder” and rename it to “Annual Worlds of Wonder BW”. We don’t need to worry about the files in the folder at this point.
4. Setting the Template to the new Drawing Tools
 Now it’s time to open CC3+ for the first time. Navigate back to the Templates/Overland Maps/Wizard and double-click the template file Annual Worlds of Wonder BW.FCT to open it in CC3+. Naturally it still looks exactly like the Worlds of Wonder style, as it’s just a plain copy of it. Select File > Drawing Properties from menu to open the Drawing Presets dialog. In the Drawing Style section select the new “Annual Worlds of Wonder BW” from the list. Basically this tells CC3+ which folder to choose the drawing tools from when you click the drawing tools buttons on the left-hand toolbar. If we now make changes in this template on the its drawing tools, they won’t affect the original Worlds of Wonder style but be restricted to the new Worlds of Wonder BW style instead.
If you have your own ideas for creating a style you can already start tinkering with the template and the drawing tool. We will continue in the next article with changing the bitmap fills that the style uses. If you have any questions concerning this article and creating your own drawing style, feel free to do so in the comments below, or – for easier discussion and more help from other users – go to the forum thread I have created for this series of articles.
Comments Off on Creating a New Map Style, Part 1 – Basic Considerations
Remy Monsen | June 3, 2018 | Campaign Cartographer, styles
 In CC3+, you can make maps in many styles. Out of the box, CC3+ comes with at least 6 different overland styles, as well as a simple dungeon and city style. Depending on what style you choose, your map will look very different visually.
You’ve probably already learned that some styles are just better for some types of maps, and that is indeed one of the points with the different styles, to provide good options for many different kind of maps, but also to provide variety.
Of course, even if CC3+ comes with many styles, and many more are added if you own the various add-ons, symbol sets and annuals, part of the great flexibility of CC3+ is the ability to customize it to your needs, and one of the things you can do in that regard is to create new styles or customize existing ones to fit your needs. So, let us have a look at what a style really is, and what elements make up a style.
This article will provide a detailed overview of the process of creating your own style, but it does assume some familiarity with some of the processes
Elements of a style
Each style is made up from the following elements, all of which should be familiar to you already.
- Bitmap Fills: Almost all styles need fills, and unless you are designing a vector style, these will be bitmap fills. Fills are a very prominent part of any style and are a major factor in setting the visual look of the style.
- Symbols: While you can make a map without using symbols, most maps do use them. Symbols are usually designed to match the fills of the style.
- Drawing Tools: These tools are set up to draw various shapes, such as landmasses and terrain, using the fill styles defined for the style.
- Effects: All styles have their own unique set of effects, tailored to that style of map.
- Template: The template is the glue that brings all these elements together. Bitmap fills are referenced from the template, macros load the correct symbol settings, the correct set of drawing tools is set as a property in the template, and effects are embedded in the template, ready to activate.
Note that almost all styles have all the elements above, but they can be shared among several styles. For example, both the bitmap styles in SS3 uses the same bitmap fills, but they have their own unique set of symbols. You can also make a style that collects multiple styles into one.
Let us dig into these elements and see how to make them
Continue reading »
5 Comments
Clercon | October 15, 2012 | styles
I’ve been asked by Profantasy to turn the map style I used for the Truscian peninsula into a CC3 style (let’s just call it the Truscian style from now on). The thing is that when you sit and draw for your own needs you usually can cope with a lot of mistakes in your maps, maybe the city icons look a bit off or the hills just don’t look exactly as you want them to look. But that doesn’t really matter to someone else then yourself. When you suddenly are doing something that other people might be using those things start to matter and that can be a bit scary. Most of all you want it to be perfect, you don’t want it to just be ok.
Suddenly you also have to make decisions. How many types of terrain do you need? Do you have enough city icons? How many city icons are enough? The questions can very easily become quite many. The best thing to do here is to actually sit down take a piece of paper and start writing down what types of terrain you already have, what types are missing, what icons do you want, do you need some terrain features that you have to make. Do you have a compass rose and a scalebar? Get it all down and try to make a plan on when things shall be done.
When I started to put it all on paper I soon realized that I was missing a desert, some wasteland and volcanic terrain. I needed some new city icons, a volcano or two, maybe some graves, hills and so on. But now when everything is on paper and there is a plan, it is much easier to start working.
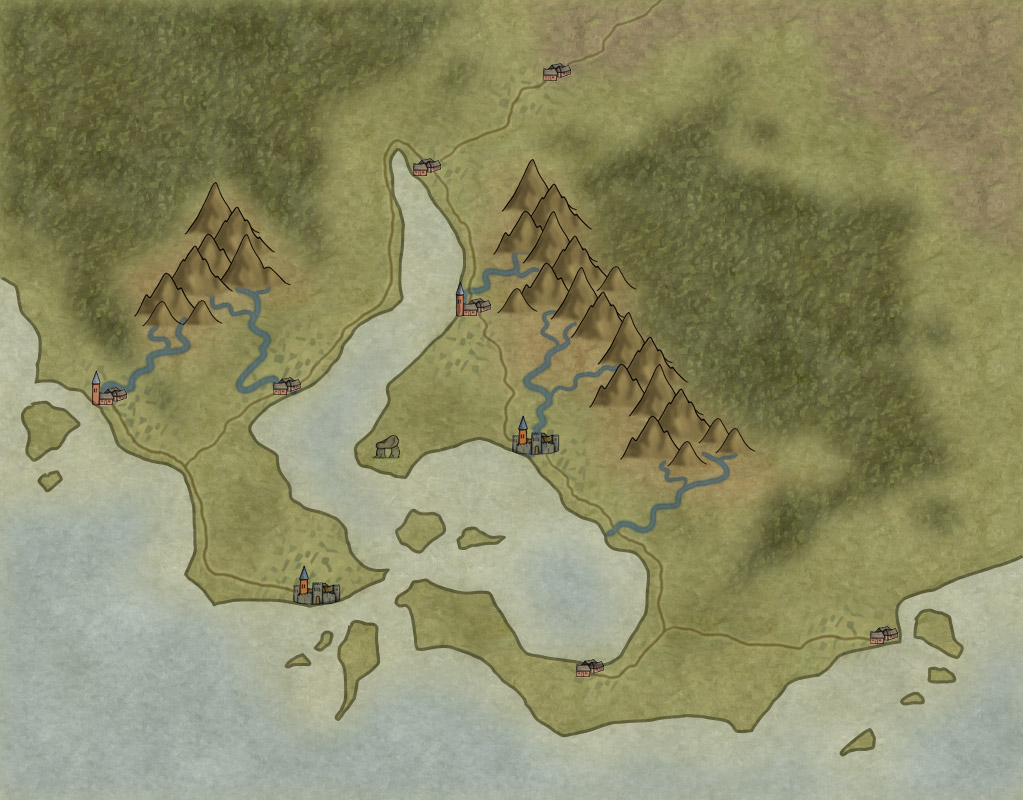
The map below is a test map of the style that I’ve made in Photoshop. It consists mostly of seamless tiles that I use as patterns. Every terrain type is on its own layer and I’m using layer masks to make the terrain visible where it shall be seen. The mountains and city icons are drawn objects that I’ve pasted in on top of the terrain layers. There is still no compass or scale bar, but I have a fairly good idea on how I will do them.
Well in December you will see the finished result, if you subscribe to the yearly annual. Hopefully some of you will find it useful.
Originally posted on mappingworlds.wordpress.com
3 Comments
 In CC3+, each template is designed for a single style, which comes with it’s own symbols, fills and tools, while the resources belonging to other styles are not directly visible in the GUI.


