SteveDavies | August 1, 2011 | building size, city mapping
We’re going to take a minute today to figure out reasonable sizes for the buildings in your city. I’m sharing some of my ‘rules of thumb’ for getting buildings that will work well. While you can finish a map without doing this, if you take a minute to make reasonable sized houses, your blocks will look better and it will be easier to just automatically convert a building from the city map into a tactical encounter map.
Our first order of business is to estimate the size of a pub. Why? Because it is a good reference size for all other business buildings.
Start by figuring out how many patrons the tavern should be able to handle comfortably. Let’s say for a given merchant-class ward, a typical pub should be able to handle 30 patrons easily. I assume that a nice tavern needs about 5’x5’ for each patron. If you want to ensure there is plenty of room for tactical roleplaying (in other words, a bar fight with lots of running around), you might double this. High end taverns might have 2-4 times as much space, and a cramped seedy bar might have half as much space.
So for our nice unassuming tavern that can serve 30 people, we will use 30 5’x5’ squares, which makes it roughly 30’x25’ in size.
An alternate way to get a rough size of typical buildings in our ward is to reference the symbol set that we’re going to use. Below I have two symbols from the symbol set I’m using.
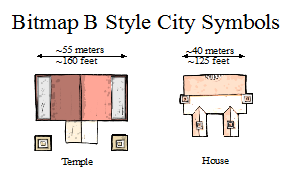
Standard CC3 City Symbols are landmark buildings
ralf | July 30, 2011 | Jon Roberts
Mark Needham created these beautiful castle floorplans for the Time Ref – Medieval History website:

He used the Jon Robert’s Dungeon style released as the June issue of the Cartographer’s Annual 2001. This style is freely available for download and showcases the beauty of Jon Roberts’ artwork, as well as the value of the content of our Annual subscription.
1 Comment
SteveDavies | July 12, 2011 | city planning
In this, the fourth part of our series on mapping cities, we will spend time setting up a district using Campaign Cartographer 3 (CC3). We will be using the City Designer 3 (CD3) add-on because it makes the job of mapping cities much easier. But pretty much everything we do in this tutorial can be accomplished with the based program – it’s just more work, and your style and building options are fewer.
When we get to the step of mapping individual buildings, you’ll definitely want to have a copy of CD3 because the end result is so much better.
We are going to rough out the entertainment district of our map (the red district just above center):

My original city map was created in an old version of CC3, so we’re going to copy the district and put it in a new map. Continue reading »
3 Comments
ralf | July 6, 2011 | Deadlands, Paper Models
This month’s Annual issue on paper modeling is not the first time I’ve messed with Dioramas Pro, paper, glue and a trusty hobby knife.

Whitewash City and Cardstock Cowboys
t all started with our
Deadlands: Reloaded campaign. Savage Worlds was our first game system that put a really heavy emphasis on miniatures, and I started painting a few Western miniatures for our characters, as well as investing in some fitting paper minis. Then Eric Hotz’s beautiful series of Wild West buildings (Whitewash City) caught my eye and soon enough I was busy building paper models for our game.

Mexican Fort in Perspectives Pro
This was all well and good until our posse ventured south and into Mexico, and the American-style buildings suddenly didn’t fit the mood anymore. When it became clear that our characters would have to free a rebel leader from a fort, I started out by drawing a Mexican fort in
Perspectives Pro. This came out very nicely, but it wouldn’t really help out on our gaming table.
Dioramas Pro then came to my mind and I asked myself, why I shouldn’t be able to design and build a few mexican-style buildings myself. They’d not come out as marvelous as the Whitewash City models, but probably good enough for ourselves. So I fired up CC3, loaded a Dioramas Pro template for the first time in quite some time and set about designing my own models.

Construction Sheet for Gatehouse
There was a lot of trial and error at first, the project grew and grew, the paper bin overflowed, but I finally managed to create the complete set of buildings as shown in the Perspectives Pro map. I even added some extra goodies like cannons, the village fountain and a graveyard.
We had a blast in the two game sessions our posse stormed that fort and successfully freed the captive. The time I spent on building the model is of course way beyond what you’d normally spend on preparing one or two game sessions, but I had a blast and learned lots about paper-modeling (and Dioramas Pro) in the process. The fort even served as a display piece at Spiel’10 in Essen. And here it is on all its glory:

More images of the fort and other props of our Deadlands campaign can be found in my online gallery.
4 Comments
ralf | July 1, 2011 | Annual, dioramas
 Dioramas Pro is one of the more rarely used add-ons of CC3 – rather undeservedly though in my opinion. With a little care and patience it can create some spectacular setups for your gaming table.
This month’s Annual provides an example of what can be done with Dioramas, plus the tools and templates to create more paper models. So, break out those hobby knifes and glue bottles and start modeling…
Continue reading »
2 Comments
Simon Rogers | June 30, 2011 | upgrades
 At least 65% of our CC2 Pro customers have upgraded to CC3. Of those who tell us why they haven’t upgraded, the most common explanation is “CC2 Pro does everything I need. Why do I want this fancy new artwork?”
This unsolicited email from William Toporek, posted with permission, explains better than I ever could the reasons for an upgrade. It also offers Joe Sweeney a well deserved shout-out for his video tutorials.
I must say that I see some excellent improvements in the ease of use department. Many of the old CC1 and CC2 “way of doing things” have been streamlined and many of the “quirky” bits that CC2 had when drawing have been fixed. The cutting symbols work better than ever! I really like the Sheets and Effects and especially want to say thanks to Joseph Sweeney for putting together those superb tutorials. I never would have been able to figure out, let alone use the POWER of the Sheets and Effects. Adding shadows and using all those effects to take one map and turn it into many without having to redraw everything is worth the price of the upgrades. CC3 is such a powerful program with soooo many functions I’m glad your company is using those videos to help show off all that it can do. MORE PLEASE!!! I’m still a firm supporter of all your products. I know this was a bit of a speed bump with all these upgrade problems* but I’m happy I did it. I’ve been a customer for well over a decade and was there with you guys from CC1 and the 3.5″ disks. I have to admit that I was a bit hesitant to upgrade to CC3 with the extra cost and I just figured that I didn’t need any more power than CC2 or that I was just satisfied with the style of CC2 but after using it it was well worth it. So much easier to use than before and my maps are just spectacular!
Thanks for all the help getting me back up and running your customer service has been superfast, especially from across the pond. Tell Nigel thanks again for an excellent product. I’m sure he doesn’t remember me from the Gen Cons, GAMAs, and Origins of the late 90’s and early 2000’s when I used to work for Steve Jackson Games but I want to share my appreciation anyways. Just to show some more “love” I’m off to download the Cosmographer 3 and City Designer 3 upgrades right now from your online store! Thanks so much!
*William had some installation issues which we resolved
Comments Off on Reasons to Upgrade
SteveDavies | June 21, 2011 | city planning
In the previous two installments of this series, we determined where a city is likely to arise, and did some basic planning for a city (read Mapping Cities Part One here and Part Two here). In this installment we will plan out a district in more detail.
There are four things to keep in mind when thinking about the structure of the district:
- Roads and Traffic: Are people mostly passing through (e.g., a gate ward) or heading to this district (e.g., a merchant area)? This will determine road size and pattern, with wider roads for main thoroughfares and places where livestock must travel.
- Planned or not? Cities rarely arise all at once, and different areas get different amounts of planning. Unplanned sections typically grow up along a road, or near a point of interest such as a well, then fill in between the spaces. Planned areas are more likely to have uniform plot sizes and more organized roads.
- Style of the buildings: Do the buildings face inward, typically toward and inner courtyard? Or do they face outward toward the street, typically with stores or other commercial endeavors facing the street. Buildings with courtyards will require more space.
- Density: Near the center of a city there is little open space – houses are more tightly packed. Further away from the center there is often room for livestock or family gardens.
Affecting all four of these mapping factors is the question of age: As districts age, they change and deviate from plans, space is filled in, walls are torn down, roads and squares infill. A fundamental right for city dwellers was the right to own land, and new cities are laid out in standard-sized burgage plots. The size of these plots vary from city to city, but are uniform within the city: Typically 10-20 meters wide facing the street, and 50-100 meters deep when first laid out.
The plots are large enough for outbuildings, keeping animals and small gardens. But as space pressure increases, the plots are subdivided and filled in. Usually the divisions stay within single plots, but the example below shows two plots that were split up together.
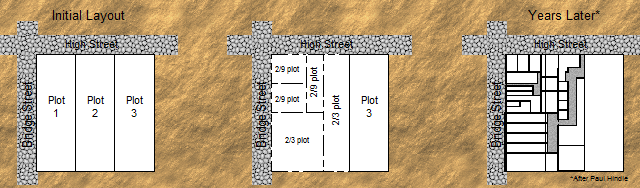
Over time city plots are filled and subdivided
As you lay out plots, you need to make sure that every building has access of some sort to the road, even if it is through an alley. In the example I give above, the grey areas are alleys. As you have ideas for points of interest, add them now or make notes for later.
I occasionally cheat and put in plot divisions that are not road-accessible. I just know that they will need a passageway through another building (maybe an arched gateway) or they need to be abandoned buildings that I can use later in my campaign.
Next time, I will show you how to apply these rules in Campaign Cartographer, using an entertainment district of my city.
The City Mapping Series
Part 1: Location, Location, Location
Part 2: Urban Planning
Part 3: Laying out Districts
Part 4: Districts in CC3
Part 5: Sizing Buildings
Part 6: Filling Blocks in CC3
Part 7: Houses Galore!
Part 8: Outside the Gates
3 Comments
ralf | June 14, 2011 |
 CC3 can be put to many uses apart from mapping, especially if you take some of the more specialized add-ons into the mix.
Several years ago (lots actually), when I was into naval miniature games but lacked the funds to collect pewter miniatures on a larger scale, I resorted to scratch-building ships from sturdy paper, toothpicks and paper-clips. The design process was laborious and I had to keep the little paper parts around for future rebuilds of the models.
Continue reading »
3 Comments
Simon Rogers | June 10, 2011 | overland, Pete Fenlon
Our Annuals are designed to give value year after year – as an example, I give this flashback to May 2008 from my livejournal…
Many of us remember, and were inspired by Pete Fenlon’s wonderful maps for the Middle Earth Roleplaying Game. Today, Pete is Chairman and Studio Director at Mayfair Games. In January 2008, with Pete’s permission we released a style pack for making maps in his style as part of the Cartographer’s Annual 2008.
Steve Townshend produced this beautiful map in the Pete Fenlon style.

It uses only specially designed vector symbols combined with CC3’s effects to get the right look.
Style packs are preconfigured so that if you select a tool (for example, rivers, roads and terrain), it looks right for the map style. To create a forest, you just select the forest draw tool, click points for the border, and it does this, adding random tree tops and edge trees.

You building up mountain ranges by selecting a symbol, then placing. They are selected randomly from a collection of symbols. So this was one click per mountain, and the mess at the bottom is a mountain cursor. You can tab through random styles if you don’t like the current mountain at the cursor.

The distinctive ridges are also built up of symbols. On the left, with CC3 effects off, on the right, with them on.


Although the styles definitely make it easier to create maps such as these, Steve Townshend demonstrates that the human touch is still required to get an aesthetically pleasing map – style packs just make it easier to get the desired effect.
You can download the map in CC3 format here.
4 Comments
Simon Rogers | June 9, 2011 | review
There’s a review of CC3 over on PlayDevil.com 9/10.
Below is the first map that I made using the software, and it only took me about 20 minutes- a similar drawing in Photoshop from scratch would have taken me several hours!
“…for a budding cartographer there is nothing else quite like it out there. Once you have broken into the software, creating a good standard of map becomes not only easy, but a pleasure, as you behold your beautiful creations, which can be made quickly and simply.”
Comments Off on Review of CC3


