 I’m usually quite impressed with myself whenever I finish making a map in the program.
Matt Carlson gives a short review of CC3+ (together with other software resources for RPGs) on GamerDad.
I’m usually quite impressed with myself whenever I finish making a map in the program.
Matt Carlson gives a short review of CC3+ (together with other software resources for RPGs) on GamerDad.
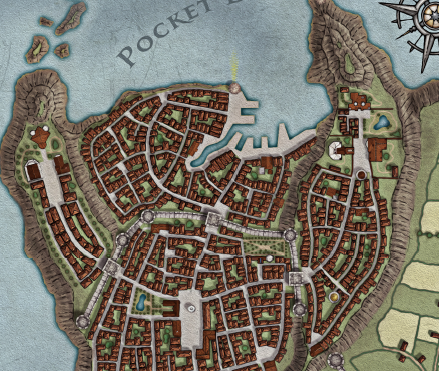
 City Designer 3 now works with CC3+. It has shiney new icons, and you can make use of the lighting speed and new effects of CC3+ to create your city maps.
So, if you own CC3+ and City Designer 3, head over to your registration page and download the free compatibilty update – CD3 Setup for CC3+. You’ll find the link among the City Designer 3 files on the Downloads & Updates tab.
It took a few weeks to create this update, because we had to polish up the House and Street tools, as their code wasn’t working properly with the updated CC3+ programming. The House is some of the earliest we wrote – it goes all the back to the tools we used to create the Forgotten Realms Interactive Atlas.
The good news is that most of the upcoming compatibility updates don’t need much additional programming. Updating their templates, symbols and drawing tools will be a more straightforward process. Next up is Character Artist 3.
If you are a subscriber to the current Cartographer’s Annual, the April issue (Black and White Towns), which makes use of the City Designer tools, is now also available for CC3+.
 Have you ever wondered how to create a cut-out in a CC3 polygon (a hole that allows you to see the entities underneath)? Ever struggled with using that most arcane type of entities: Multipolies?
Wonder and struggle no longer, Master Mapper Joachim de Ravenbel has written a new tutorial on the topic, which will teach you anything you need to know. On 15 pages he shows you the basics about the Multipoly entity, as well as full bag of tricks to make the most use of them. Thanks, for another great resource!
It’s time for another look at last month’s maps on the community forum. Let’s see what the CC3 users have come up!
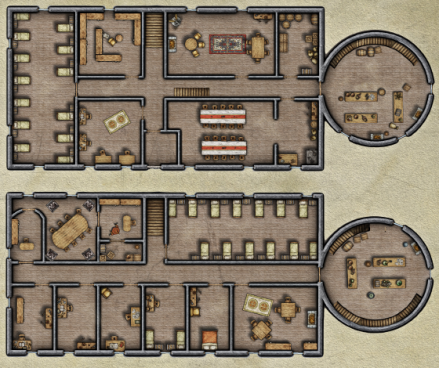
Look at these beautiful floorplans created with Symbol Set 4 (Mike Schley Dungeons) by SlaveOne. Check out the forum thread for even more of them. I’m especially in love with the “Lucky Hobitz Futs” tavern.


Suntzu is using CC3+ to draw maps of Harn, look at his beautiful versions of the whole of Harn and the Melderyn isle.


Continue reading »
 The Annual’s April issue is here on time (and totally without a prank), with another beautiful black and white drawing style by Pär Lindström. This time he gives us the tools and artwork to draw town and village maps in a beautiful, but still easy style. As always you can download the “Black and White Towns” style from your registration page.
If you haven’t subscribed to the Annual 2015 yet, you can do so here.
[Ed’s note: this great tutorial introducing editing was written by new CC3+ user R A Jacobs who is on a mission to learn CC3+ – follow his journey here. It features the first map by another brand new CC3+ user Kalthorine. See his original post on the forum.]
 Before We Start…
Selecting something on a screen by pointing and clicking is a very common activity that you probably do hundreds of times a day on a computer. When you think about it, it’s like picking things up with your fingers. You move the mouse to the icon that you want to open, or move, or delete; you select it by clicking on it and then you do some action. Modern User Experience Designers have made selecting objects on a screen very easy; often times, you only need to click within the vicinity of an object in order to select it.
And, what I learned this weekend, is that that is one of the reasons why you fail when you try to do just about anything in Campaign Cartographer.
Whaaaaaat?
Before you learn to do anything in Campaign Cartographer, you have to remember a few things:
 For this post, I’m going to use the Khalkaeareon map created and posted by Kalthorine to the ProFantasy Community Forums. Be sure to grab the map, not just the image of the map.
There are many ways to select something on a map in Campaign Cartographer 3+. I tend to think of these options in terms of “Fundamental” and “Advanced” techniques.
Over the next two posts, we are going to look at what I consider to be the “Fundamental” select techniques. Part 1, today’s post, will cover:
In Part 2, we will take on:
At some point in the future, we’ll cover the following “Advanced” techniques. I haven’t yet had a lot of reason to experiment with these so I want to better understand the mapping situations best solved by these tools:
Let’s get started…
Why You May Want To Use This Approach: You want to keep the template, tools, etc. that you have created for a particular map but you want to start the entire map over from scratch. In more advanced cases, you want to keep everything on two or more layers but get rid of everything else.
By far one of the easiest ways to select entities in Campaign Cartographer is to just select all of them. For now, let’s just assume you want to erase everything on a map and start over – but you don’t want to pick a new template or anything like that.

 Every entity on the map is selected. The invisible outlines are presented in pink so you can see what you have selected.
The goal of this tutorial is not to teach you how to erase entities, just select them. We’ll leave it there.
 Why You May Want To Use This Approach: You want to move everything on a single layer to a different layer; you want to erase everything on a single layer.
Next to Select All, selecting everything on a layer is easiest.
Over the weekend – you know, when I supposed to be making maps not learning about “Select” – Select by Layer came in handy.
I was following the Campaign Cartographer 3+ User Guide Tutorial on “Converting Your Old Maps” (pp. 84-86) and I kept getting stuck on Step 6. By Step 6, you’ve loaded up and scaled a bitmap or PNG image of your old maps when you discover that your old map is just a bit smaller than what you want your new map to be so you’ve got to move and scale the old map. You are going to do this by first aligning the inside corners of the two maps. To do this, you need to select edge of the bitmap (“With the crosshairs, click in the lower left corner of the old map.”).
I could not get it done1. It. was. so. frustrating.
It is, in fact, my inability to select a bitmap that led to the creation of this post. Since the bitmap was on its own layer, a very simple way to have accomplished this would have been to Select by Layer.
To illustrate a practical use of this Select approach, let’s say you want to move everything from the MINERALS/MOUNTAINS layer to another. To make a change like that, the tool you want to use is the “Change Properties” tool.
Once again, we aren’t really learning about moving entities between layers so we are going to leave off at this point and move on to the next task.
Why You May Want To Use This Approach: You want to select more than one entity within a specific area of your map in order to move the group to another area of the map. You want to select a tight grouping of related objects and change their properties. You want to select a tight grouping of related objects and delete them. Lots more.
Select All and Select by Layer are very ham-fisted tools. They select a lot of entities without a lot of finesse. They have their place but, most of the time, you are going to want to work with a few entities at a time.
To start to get finer control over what you select, you can actually define a Window to select multiple items within an area at the same time. To use this technique, you select two points on opposite corners of an imaginary rectangle (“Window”). Everything inside the window is selected.
For this select exercise, let us assume that we want to move a the cluster of towers from near Drakenhold in the Upper Left Corner of the Khalkaraeon map.
 Click the “Move” button from the”Edit” toolbox to the left of the Symbol Catalog. See Figure 4.
 There are some gotchas that go along with this approach. This approach works on the concept of “intersection”. Any entities that fall within the boundaries of the Window you define are going to be selected. Because symbols frequently overlap, there is a good chance that you may pick up entities that you did not intend. In Figure 5, I was trying to select just the three towers towards the middle of the image. I got a lot more than I wanted.
So what can you do? Here are a few ideas:
Why You May Want To Use This Approach: You want to execute a command on one entity – most likely to delete or move it. You want to execute a command on a few entities from among a group of entities – most likely to delete or to move them.
Now we are zeroing in on it. You want to select a single entity and execute a command on that entity. To do this, you have to click on the edge of the entity. Ah…but that’s the rub: Where is the edge of the entity? You keep clicking the symbol you want to select and all you get is a cross-hair and you wonder, why can’t I pick up this symbol?!
If you look at either Figure 3 or Figure 5 above, you will see a pink colored box around the entities that are selected. This is not the edge of the entity. Let’s call this the “border”.
If you look at any sufficiently styled symbol, you will find a lot of edges within the icon. Again, this is not the edge of the entity. Let’s call these the “lines” that define the symbol. The edge of an entity is a line.
The core problem is that you expect Campaign Cartographer to work like your Windows machine. In Windows, you click in the center of an icon on the screen to use it. That’s not how it works in Campaign Cartographer (remember those habits I said you needed to unlearn in the Overview, above? Yeah. This is one of them.)
The edge of the entity is defined by the outer lines of the symbol regardless of where the border of the entity may be. To select by clicking the “edge of an entity” you must click the outer lines of the entity. Clicking a line/edge in the middle of the entity will not select the entity.
In my (albeit limited) experience, it is much easier to select a single entity by working up close. For this particular select exercise, let’s us assume that you want to move Drakenhold castle in the Upper Left corner of the Khalkaraeon map.
 Find Drakenhold castle on the map. It is in the Upper Left corner of the map.
In Step 5, if the “Selected Entities” count is 0 or greater than 1, you’ve either failed to select the castle or you picked up something in addition. You need to deselect and try again.
Why You May Want To Use This Approach: Using another approach, you’ve selected one or more entities that you did not intend to select. Before you complete your command sequence, you need to reduce the number of entities selected.
As you seek finer and finer control over the number of entities you want to select, you are going to select entities that you did not intend to select. Before you right-click and select “Do it”, you need to clean up the collection of selected entities.
First, double-check the Command Line and the Command Prompt to see how many entities are currently picked. If you think you’ve got 1 but the command line says you’ve got more, you’ve got clean-up to do.
There are two basic ways to deselect an entity. You can choose to cancel the command or deselect entities one at a time.
 But wait! If the items are no longer selected, why are they still surrounded by a pink border? To save resources, the Drawing Window does not refresh after every command. If you still see pink borders, click the Redraw button to the upper right (see Figure 8), use View > Redraw or type CTRL-R. If the pink border does not go away, then you did not deselect the entity.
In general, any time something doesn’t quite look right on the map, it is probably a good idea to “Redraw”. To clean up my drawing left-overs, I find myself doing this frequently after deselecting entities and executing other commands.
My gut tells me that if I want to get good at Campaign Cartographer – to really master it – I need to spend time really learning these fundamental skills. Just from playing around with these techniques and then writing them down for your benefit has been extremely helpful to me.
How about you? Did any of this help? Do you have a trick for selecting objects within CC3 that gets you out of tricky situations? What is it? Leave a comment and tell me about it.
 It’s time for some futuristic maps with the March Annual issue that has just been released. Steph McAlea created a set of symbols and textures that makes drawing planetary star ports a snap. Grab the style pack “SciFi Downports” from your registration page.
If you haven’t subscribed to the Annual 2015 yet, you can do so here.
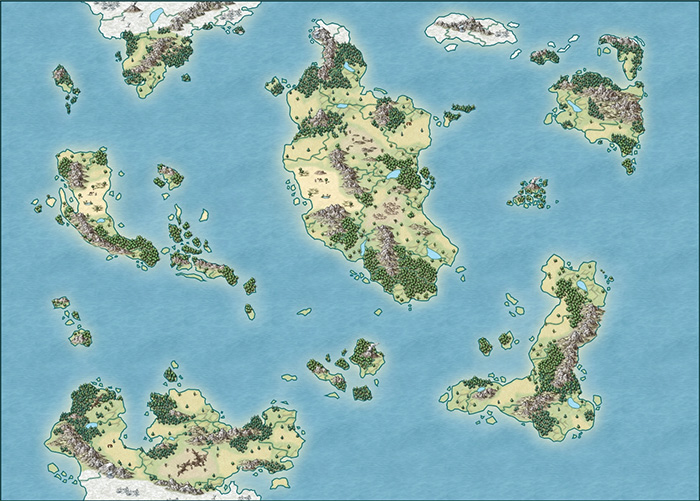 CC3+ is only a few days out and we already have the first user tutorial on the community forum. Malmo3000 modified the new Mike Schley Overland style to create his Skalderand map depicted on the right, and explains his process in this tutorial. Here’s what he has to say:
I recently started drawing with CC3/CC3+. Despite other comments I've read in multiple forums the learning curve wasn't a big deal for me as beginner. In my opinion the most challenging part is to find a way of mapping and thus creating a "own" style that suits you the best. As some of you noticed already in my thread called "Skalderand [CC3+]" I've found my personal "style" of mapping. So I wrote a little step-to-step tutorial for myself to produce multiple maps within CC3+ with a consistent look. In here I use mostly basic stuff and nothing fancy so with the help of the manual you shouldn't have any trouble of following. I really hope this will help other beginners to CC3+ when coming up with their personal style.
Download Malmo3000’s Campaign Cartographer 3+ Tutorial
Pelgrane Press, ProFantasy Software‘s sister company makes tabletop RPGs, and as such has a burning need for cartographic resources, so of course we take advantage of the connection. We’ve collaborated on a number of projects in a number of styles – styles we’ve then bought to our users. The latest such colloboration will be The Dracula Dossier – a Kickstarted project featuring spies versus the greatest vampire of the them all, for which Ralf will be creating maps. Back it here.
So, here are some of the other projects we’ve worked on together.
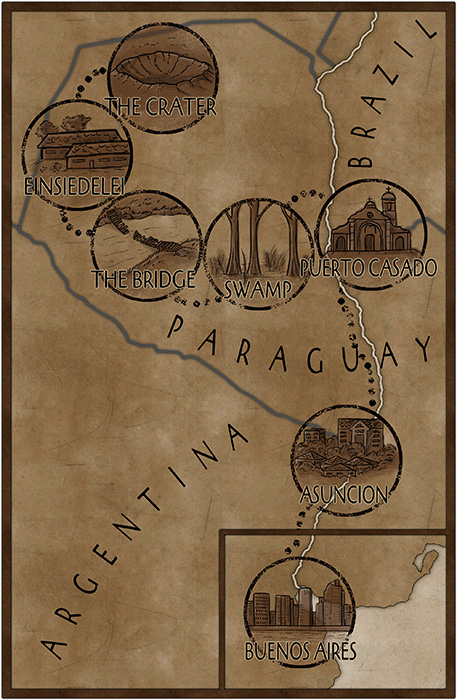
Created by Pär Lindström and designed for the the Pelgrane Trail of Cthulhu adventure collection Mythos Expedition the style lets you depict the itinerary and visited locations for journeys or expeditions as would be found in horror or pulp adventures.
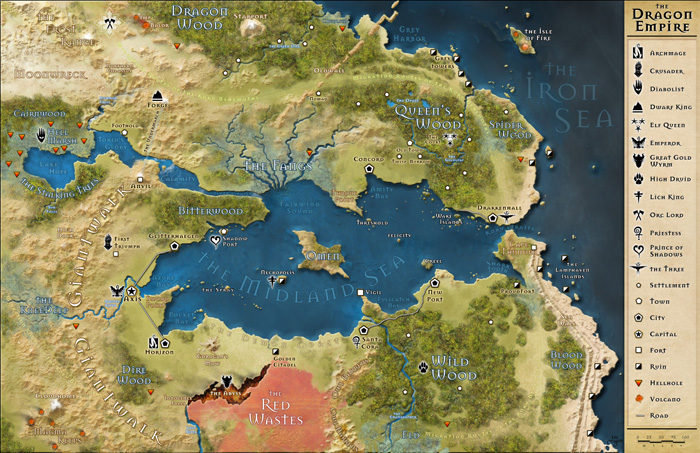
The September issue of the Annual 2012 contains a new overland style based on the gorgeous world map of the upcoming role-playing game 13th Age by Rob Heinsoo and Jonathan Tweet. The style was developed by Lee Moyer.
The December Annual 2011 brings you a companion style to April’s 1930s floorplans: city maps in the same Baedeker travel guide style for your modern horror and pulp-style games. Pelgrane Press used this in Arkham Detective Tales Extended Edition.“>
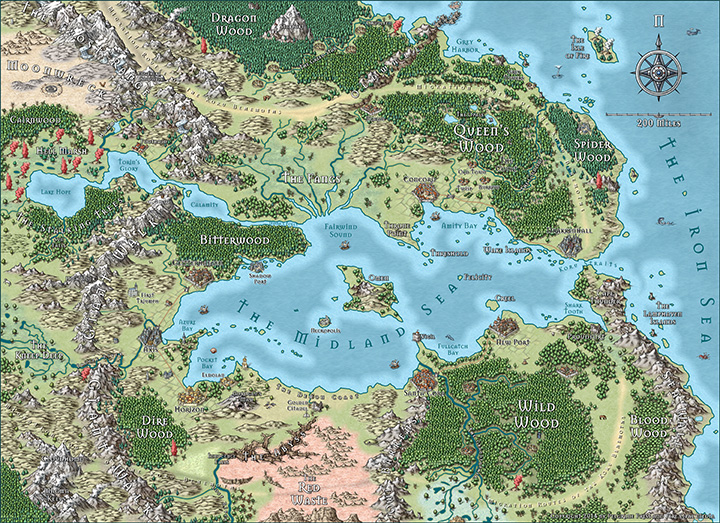
Ralf Schemmann recreated the 13th Age map in the Mike Schley overland style included with the forthcoming cc3+.
Pär Lindström created a city map and floorplans for the 13th Age city adventure Shadows of Eldolan using CC3, City Designer 3 and the Symbol Set 4: Dungeons of Schley style. He did some post work on the city map in Photoshop
[Cross-posted from the author’s blog. Benjamin contacted us about writing an article on using CC3 and creating a map for his book “Dragon Choir”. We are more than happy to share it here for your enjoyment.]
A Special Kind of Art
Maps are a special kind of art. Their beauty is often passed over for their function, but every map possesses a rare kind of potential, something magical.
Whoa there! Magical?
You must think I’m just a typical fantasy writer, banging on about magic again. Well that might be part of it, but let me explain the rest.
Jingle Bells
Ever since I was a kid, looking at a map would send jingling bells up my spine. From mud maps on a scrap of paper to detailed foldouts in National Geographic, I couldn’t resist them. My desk drawer was stuffed with piles of hand-sketched maps, documenting secret hideouts, traps and treasure. I even had a map of my hometown sticky-taped to my wall with annotations showing the locations of my friends’ houses.
My favourite fantasy books all began with a map and followed with a story that delivered the promise hidden in the landscape. Dungeons and Dragons lured me in to play the magic upon the map, and with the digital age came an evolving boon of sci-fi and fantasy computer games. Even today, at the bleeding edge of gaming, the most immersive and well-loved games revolve around a map. The map is our foundation; it is the lynchpin that connects us to the magic of possibility.
Mental Stretch
No matter how large or detailed the map, I examine the edges and wonder what exists outside its jurisdiction. Maps trigger a mental stretching that teases out the possible from the known. There is always more to a map than what you see; change the scale, change the perspective, and change your world.
Sticks and Sand
I contend that maps are a link to our deepest psychological urges of curiosity and territory. They are an embodiment of demarcation, inherently political in how they are depicted and interpreted. Once our primal drive involved patrolling the clan patch and scent marking trees as we went (I know some people who still do), wondering what lay on the other side of a river or ravine. We evolved from sticks drawing lines in the sand, to quill and ink, charting ever further across oceans to exotic lands, always pushing the boundaries of existing maps (often to the detriment of those in discovered territories). Today the great unknowns of nautical and geographic exploration expand further still with astronomical pioneers.
Maps are Magic
The humble map is the device that mentally transports us and inserts us in a physical terrain tinted with cultural heritage, lined with political borders and soaked in context. Maps weave a world and compress it into an image.
That, for me, is something magical.
Political Correctness and Cartography
For my debut novel, Dragon Choir, I wanted to create a map that spoke with the politics of the fictional mapmaker. My map establishes the bigoted perspective of a colonising power. Maps throughout history have been tools of propaganda, yet I have noticed that the majority of maps for fantasy fiction are devoid of political or cultural imprints. Fantasy maps can add extra punch to a narrative if they have a contextual point of view. Why be politically neutral if the plot of your book is politically contentious? Political borders are as fluid as the opinion of the powers that commission the maps.
Below is the map I created using ProFantasy software, Campaign Cartographer 3 (CC3). Why did I use this software? The simple answer is that it is the best mapmaking software on the market. The ProFantasy website and community is jam full of support and ideas. The CAD software is powerful and upgradable, allowing an amateur cartographer like me to produce a professional looking map like this.

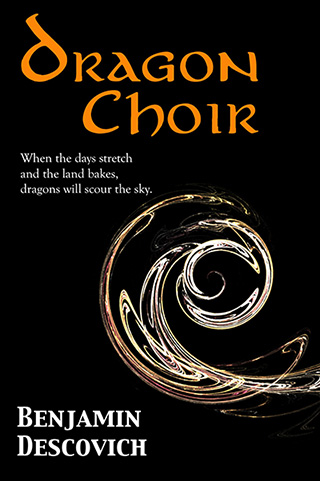 When the days stretch and the land bakes, the dragons will again scour the sky. A city of bones and a city of gold plot against each other while the rebellion gathers strength. A young man is caught in a tempest of intrigue that will forge a new era of freedom, or forever scar the land. He must discover the secret of the Dragon Choir to save his father and end the stranglehold of an unforgiven nation.