Simon Rogers | January 30, 2012 |
News
The Cartographer’s Annual 2012 subscription is out now. See previews of January, February, and March, and the the Annual 2012 site.
The Cartographer’s Annual 2011 is out now – read a summary of the monthly content here.
Articles
Art Preview
This is one female paper doll for Character Artist 3.

5 Comments
Simon Rogers | January 27, 2012 | Tome
by Remy Monsen
 I am sitting here writing on the final parts of the new version of the Tome of Ultimate Mapping. That’s right, the release of the tome shouldn’t bee too far into the future.
For the old-timers, and many of the newer users, you already know what the tome is all about. But for the rest of you, the tome is a rather large volume containing tutorials, tips & tricks and reference material for the complete collection of ProFantasy’s software.
This is an updated version of the previous tome. I’ve updated tutorials and information that is still useful in CC3, and added new CC3 content to take full advantage of all the new features in CC3 compared with CC2 Pro. The same goes for the new features from the various v3 add-ons available.
Right now, the book focus on all the current versions of the various programs, that is Campaign Cartographer 3, Dungeon Designer 3, City Designer 3, Cosmographer 3, Symbol Set 1 v3, Symbol Set 2 v3 and the compatibility updates for Dioramas Pro, Character Artist Pro, Perspectives Pro, Symbol Set 3 and the Source Maps series. The plan is to update the tutorials based on the compatibility updates to the proper v3 versions as the updates for those add-ons are released. Therefore, the tome will only be available as an electronic pdf file for now, with a print version released after all add-ons have been updated to proper v3 versions, since a printed book is a bit more difficult to provide a patch for compared to a pdf file!
The tome helps you make better maps with CC3, but also teach you how to be a better CC3 user. The tutorials stretch from making a basic overland map to how to customize the CC3 menu files and write your own macro commands. In-between this, we have a look at how to create the various types of symbols available in CC3, many tips for using the sheet effects, and much more. The Tome goes through each of the add-ons in turn, taking care to make the book useful even if you don’t have all the add-ons, but at the same time helping to tie the add-ons a little bit closer together.
The tome itself is designed to be a resource for most CC3 users, regardless of proficiency level, although if you are just starting out with CC3, I would recommend working through the manual first to get a grip on the basics of CC3.
Writing the new version of the tome has been a fun and interesting process. I remember when I first read the original tome myself, written by Master Mapper Allyn Bowker. It was filled from cover to cover with all kinds of interesting stuff about CC2 Pro. I was a novice user back then, and I was really impressed by all the fantastic maps I could make using the information in the Tome. It discussed techniques I never would have thought of on my own, and it opened my eyes for many of the capabilities of the various add-ons for CC2 Pro. Fast forward a few years, CC3 comes along, and the style of maps one could make changed radically. I still found the old Tome to be highly useful, but I was also hoping ProFantasy would create an updated version soon. I was rather proficient in the usage of CC3, but I was really looking forward to learning even more of the software.
Then one day, an email arrives from Simon, asking me if I would update the CC3 Manual to match the latest version, and bring the Tome into the CC3 era. I was a bit surprised actually and a bit unsure what to do. Here I am, eagerly waiting for the book to be made so that I can read it and learn from it, and suddenly I am actually being asked to write the thing? Well, I did some thinking, and after a short while I concluded that I did have the have the necessary skills to do it. I know CC3 and its add-ons quite well, and I have experience writing technical documentation (I am a teacher by trade, employed as an assistant professor at one of the larger university colleges in Norway, so I do write articles and sometimes even books for use by my students). So, I told Simon yes, and got to work. I started by updating the CC3 manual, which have been available for some time now, and then moved on to the tome. To be honest, it was a lot more work than I could ever have imagined when I started, but it was a very interesting process, and I learned quite a bit more about the programs in the process. I think the end result ended up pretty good, and I hope you all agree when the book is published, and that the book will do as the title of this post says, helping you make better worlds with ProFantasy’s software.

10 Comments
Simon Rogers | November 22, 2011 | map of the month
[NLP138 from the ProFantasy forum produced this excellent floorplan using Cosmographer. This is how he did it:]
 Well, I knew I wanted to do a floorplan and so my first thought was to fire up DD3 but I’m really lazy so loading the other textures and symbols sounded like a drag and I knew I wanted to use symbols and textures from Cosmo3. So instead of using Dungeon Designer I started off with a Cosmographer bitmap deckplan. I’d already spoken with my friend who was running the game to get the specifics on the size of the pods and the central hub so picking my dimensions was more or less already done for me.
The first thing I did was I drew out the pod you see in the upper-right. The walls surrounding it are actually two arcs because I was having a hard time trimming the wall to insert the door symbol – at first I drew the walls as a circle (there may be an easier way to do this but I’m still not that savvy). Once the pod was completely built (to include furniture) I copied it once and moved it down. Then I did a mirror copy of the pod to give me the same layout on the other side – originally I was just going to make 3 copies and then rotate them but I didn’t like the way that would end up looking furniture-wise so I was happy to see there was a mirror function (this was a bit of a learning experience for me). The last smaller pod was made in the same fashion but made deliberately more cramped in with a dingier looking floor texture to reflect the lower social and economical status of the inhabitant.
The central node was then drawn – I wanted to use a different deck texture from the pods since according to the gamemaster the pods were modular and could be swapped out and exchanged. I figured the central hub then would be very neutral then regardless of the other occupants wealth level. Adding the symbols was a lot of fun – but slightly tedious at times trying to get them just right and I’m sure I could zoom in to some of the sections and find tiny mistakes.
Once all of the embellishments were in place it was just a matter of tweaking the sheet effects. I used the default ones and then altered them slightly – I think I added a wall shadow to the “bulkheads” sheet and I know I played with the different symbols effects trying to keep them from throwing too many weird shadows. I also created two sheets for the legend plate in the bottom right but I think it looks pretty standard. Just a couple of rectangles with shadow/blur effects and some words on that.
On my website I’ve got the finished image (not as high rez) and a few of the “in production” images that I sent to my play group to show them the process.

Comments Off on Agent’s Dorms Map of the Month
Simon Rogers | October 27, 2011 |
There is a podcast interview with Ralf here with GMS Magazine – 14:00 in. They discuss using CC3 to create the Dragon Rage boardgame map (articles here), Dioramas, Fractal Terrains 3 and the Annuals. He also mentions the Tome – and Remy Monsen is working on a new version of that for our updated software.
Comments Off on Ralf Schemman at Spiel
Simon Rogers | October 27, 2011 | resources, review
Old Guy Gaming (Mike Summers) has a review of Fractal Terrains 3.
He’s also written a useful tutorial on how to create dungeon geomorphs with CC, and has lots of other useful cartographic info on his site.
Fractal Terrains is so easy to use that you can literally install it and have an amazing map in a matter of minutes.
Comments Off on Review of Fractal Terrains 3
Simon Rogers | October 26, 2011 | Fractal Terrains, Terraformer
This is a follow-up to Creating a Fractal Terrains world with Terraformer Part 1.
You can download the whole tutorial as a PDF – Steps to doing a barren world in Fractal Terrains.
Moving the drawing to Campaign Cartographer 3 / Cosmographer 3
Step 10 – From here on out, I will be using CC3. This is a great program that I have come to rely on to create all of my maps. I should note that the steps outlined here are taken directly from the “Terraformer for Fractal Terrains Pro Users Manual” created by Bill Roach. It’s an excellent guide, and I would recommend that anyone using Fractal Terrains pick this up as a reference source. The guide is available from the Registered User’s Area.

Continue reading »
Comments Off on Creating a Fractal Terrains world with Terraformer Part 2
Simon Rogers | October 11, 2011 | Fractal Terrains, Terraformer
Terraformer is a free add-on for Fractal Terrains 3 by Bill Roach. In this article, Michael G describes how he used Terraformer to create a good looking world in a matter of minutes.
Steps to creating a world in Fractal Terrains
Step 1 – I normally start with the “synthetic world” planet type. I really don’t care much for the other world types, so I tend not to use them.

Step 2- In this example, I am using the standard defaults. For most of my maps, I tend to make the peaks higher and the valleys a little shallower to accentuate the peaks. Using the Brownian Noise or Ridged Multifractal methods generally generate the best maps when doing rock type worlds, at least in my opinion. I generally stick to Ridged Multifractal, but that is a personal preference. To flatten out the landscape, I lower the peaks and create shallower valleys.

Step 3 – Once the world has been generated, I select the “Map” menu, go to the “Show Other Shader” submenu, and then select “Show Image Climate”. In this particular instance, I’m looking to create an airless world so the selection of the surface is critical to conveying that theme.

Step 4 – Once the “Show Image Climate” menu item is selected, it brings up the default color scheme, which is seen in the background. I select the “Load Image from Disk” option at the bottom, as I don’t want the generic color model that is being used. In the Terraformer directory, I select the “T050_Image_Climates” folder and open that up. Again, I’m looking to convey a barren, airless, rocky planetary surface. 
Step 5 – Since I’m looking for barren and airless, I selected the image “TC239” from the list and load that as the landscape.

Step 6 – Once it is selected, you will see how the surface will look in the preview window. This is what I am looking for, so I simply hit “OK” at the top right.

Step 7 – Once the redraw is complete, I can now see how the colors have been applied to the surface. It looks pretty good right now, and I think I have captured the essence of what I was looking for in terms of the planetary background.

Step 8 – At this point, I go over to “File” and select “Export World” and then I select “Cosmographer Pro Template”, making sure I put the map in a location I can find it again. There is no “Cosmographer 3” option, but don’t worry about it, as the file type is the same.

Step 9 – To easily find my maps again, I created a folder called “My Maps” which I placed right on the desktop. As you can see, I’ve tried lots of different iterations of my maps, and I’ve created quite a few other types of maps in Cosmographer 3 (CC3) as well. In this case I will just list this as “Testing 123”. You can see that it automatically fills out the type of format, in this case a *.fcw file. As a hard lesson learned, I found it is absolutely critical to make sure you increase the pixel count to something around 4096, as you can see in the bottom left of the pop up box. If you don’t select a higher pixel count, the final figure once you bring it into CC3 will not be a very good base figure, and will look pixelated.

Step 9A – A neat little trick, if I want to add more character to my worlds, especially to moon surfaces or rocky outer planets, is to select the “Planetary Bombardment” option under the “Tools/ Actions” menu. I’ve done that here as an example. 
Step 9B – When selecting the “Planetary Bombardment” option, to really get an easily recognizable cratering pattern, I tend towards to the 2500 to 3000 “total craters” option. Choosing fewer craters tends to hide them, while adding more just completely overwhelms the surface features I have, which I don’t want either. I usually leave the defaults for the other settings, as I don’t think they add much to the final product. Once I’ve made my selections, I simply press “OK” and the program runs the simulation and applies the impact craters.

Step 9C – Once the bombardment has been added, the surface takes on a nice, randomly distributed pattern of impact craters. I actually could have lowered the amount of impacts slightly (maybe to around 1500 – 2000 or so) and I think I still would have been happy with the results. Any lower and they probably would not have shown up well.

Part 2 covers exporting into CC3.
7 Comments
Simon Rogers | September 12, 2011 | boardgames
Mapping Esirien and Nurkott
Simon from the profantasy Blog asked me if I could make a small article about the making of these two maps, so here it is.
(All images ©Flatlined games unless otherwise specified – all rights reserved.)
When I secured the rights to republish Dragon rage from Lewis Pulsipher (Best known as the author of Britannia), I knew I would need art for the game board.
The game was long out of print after the demise of Dwarfstar Heritage, the original publisher, and the original 1982 map artist, David Helber, could not be contacted.
I investigated several options, and eventually grew confident that Campaign Cartographer would allow me to generate the required map art with professional print quality and much more control over the details than if I commissioned an artist for the job.
Of course the licensing scheme from Profantasy Software was an important part of the decision, as I needed to be able to commercially use the resulting work.
I had never used Campaign Cartographer before I started work on these two map, and I learned along the way. Of course the learning curve was steep and required a full commitment on my part, but the results largely paid for the effort.
Mapping Esirien
To start, I assessed the various products on offer, and decided on using Campaign Cartographer 3, City Designer 3, and the Symbol Sets 1 and 2. The base software and City Designer were no-brainers as they are specifically designed for this kind of work. The symbol sets had some interesting styles, reminiscent of the art used in the original Dragon rage board map.

Original board map extract (© David Helber)
The smaller buildings style match the standard vector buildings from City designer 3, and the bigger building style match the buildings used in the Symbol Sets.
I started by fooling around with the software in order to get used to the basic functions such as objects, layers, rendering effects, creating grids, etc. Taking the time to learn your new tools beforehand usually pays off big time when you need to do real work.
The first step was to set up the grid, sea/river, and the board limits using tree symbols.
I placed an image of the original map in a background layer, and used it as a guide during the whole work. My goal was not to produce an exact copy of the original map, but I was careful to stay very close to the original to avoid any unwanted effects on gameplay. (Of course the final map was carefully playtested afterwards).

Initial grid and borders

Detail
After that, I added the background layer, the walls and the roads.
The vegetation, walls, and houses are placed on different layers. This makes it easy to have them cast shadows of different length, for a better depth feeling : walls cast a bigger shadows than trees, and thus seem higher.

Adding the background, roads and walls
Some tweaking was required to get good results with the roads, water, and walls.
Until late in the map development, I used straight lines for the towers and walls, and only later did I experiment with dashes to get a better looking wall effect.
The towers are simple cylinders, and the wall simple lines using the built-in textures.

Detail
Next was the addition of some grass patches, and of all the houses in the city. Small houses use the CD3 vector house tool, and the bigger houses are bitmaps from the Symbol Set.
The bridges and wharfs are also bitmap symbols, and the walls tops have been converted to dashes.
Wall and tower doors have been added, from the Symbol Set too.
Last but not least, a text layer has been added to place the point value of the key buildings (in blue).
The hex grid was ‘exploded’ and manually tweaked around the western and eastern walls to match the original board grid. This is the kind of small features that save you hours of touch-up work and allow you great flexibility in your designs.
")
Adding the houses, bridges and wharfs (without fx)
With FX rendering turned on, the map really is taking shape : Glows give the water edges a dramatic effect, and are used to differentiate gates and doors in the wall and towers (blue/red) as this is an important information in game play.
All buildings have the same shadow size, to emphasize the walls height.

Now with fx
The last step was to tweak the hex grid colour (it is actually slightly transparent), add the building names and tweak the text layer’s appearance (using a light glow to improve legibility). The bridge images were changed in order to better differentiate stone and wooden bridges, and a lot of minor details were taken care of.
I then rendered the whole map, and cropped parts of that rendering to create the map legend using Inkscape and the Gimp (We’re a linux shop, with a windows box just for mapping). I also added the turn order track, logo and copyright attribution at this stage.

The Final Map : Esirien in all its glory
Mapping Nurkott
Most boardgame boards have only one side, and the other side is black of has a pattern on it. Production-wise, it costs the same to put another image on the back than a black sheet.
I immediately realized this was a good opportunity to provide more value to our customers : two boards instead of one, two games for the price of one!
I have played lots of tactical and skirmish games, and had a gut feeling of what could and couldn’t work for a second map. I investigated a few possibilities, then decided to make an ork oppidum. It would have lots of rivers and roads, allowing for interesting tactical options.
I’d use wooden palisades made of loosely jointed planks instead of stone walls, and make use of the terrain features to the residents’ advantage.
The first step was to make a rough draft of the map :

The first Nurkott rough
That rough image was imported in CD3 and quickly converted in a basic map using the same procedure as for Esirien : first the general map outline, then roads and water, background, and walls. All using different layers in order to be able to use different effects on each kind of objects.

First step : the basic terrain features
Then, I added the housings and vegetation. Here again, a mix of vector houses from CD3 and bitmap symbols from the Symbol Sets were used.

Step 2 : houses
Some minor tweaking was required for the water borders, to better integrate the map with the hex grid. I wanted to keep the original grid shape intact, contrary to the Esirien map.

Step 3 : tweaking the map to the hex grid
The same techniques were used for the text layer. It’s quite amazing to see the level of detail you can get by zooming on the maps. Most of it is lost at print resolution as there is more details than can be printed, but every detail contributes to the overall results.

Island detail
That map was then playtested, and sent to lewis for further playtesting and approval.
I experimented with the background textures for the grass, the glows for the roads and river edges, and lots of little details such as changing the wooden bridge by a stone one after playtesting. Of course such changes would have been much more complex using an artist to draw the map. The legend was generated using the same method as above, as were the logo, turn order track and copyright credits.

The final Nurkott map
Overall, using Profantasy Software proved a good business decision, and allowed me to put a quality product on the market.
You can learn more about Dragon Rage on our website : www.flatlinedgames.com
Eric Hanuise
Flatlined Games
2 Comments
ralf | August 15, 2011 | GenCon
 Another GenCon has come and gone – it seems in only the blink of an eye. While the show was good for ProFantasy, it wasn’t quite the spectacular success we’ve had in some previous years – sales declined about 10% from a very high base, and we are still one of the few companies which makes a modest profit from GenCon. While the fact that we didn’t have a finished new product this year (FT3 is only in beta) is part of the reason, selling software which can also quite easily be downloaded from the website gets just a bit harder each year, as broadband gets more and more common and people increasingly prefer the electronic-only version of software. Our website sales reflect this. We also get a post-Con blip as people who have seen the demo make their decision.
Continue reading »
4 Comments
SteveDavies | August 1, 2011 | building size, city mapping
We’re going to take a minute today to figure out reasonable sizes for the buildings in your city. I’m sharing some of my ‘rules of thumb’ for getting buildings that will work well. While you can finish a map without doing this, if you take a minute to make reasonable sized houses, your blocks will look better and it will be easier to just automatically convert a building from the city map into a tactical encounter map.
Our first order of business is to estimate the size of a pub. Why? Because it is a good reference size for all other business buildings.
Start by figuring out how many patrons the tavern should be able to handle comfortably. Let’s say for a given merchant-class ward, a typical pub should be able to handle 30 patrons easily. I assume that a nice tavern needs about 5’x5’ for each patron. If you want to ensure there is plenty of room for tactical roleplaying (in other words, a bar fight with lots of running around), you might double this. High end taverns might have 2-4 times as much space, and a cramped seedy bar might have half as much space.
So for our nice unassuming tavern that can serve 30 people, we will use 30 5’x5’ squares, which makes it roughly 30’x25’ in size.
An alternate way to get a rough size of typical buildings in our ward is to reference the symbol set that we’re going to use. Below I have two symbols from the symbol set I’m using.
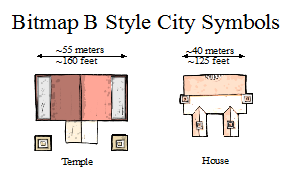
Standard CC3 City Symbols are landmark buildings


")


