by Avotas
Eight months ago I took the digital plunge into a brave new world called “YouTube” and released my very first video tutorial explaining the how to integrate maps created in CC3 and DD3 into RPTools MapTools. Since that time, and after careful reflection, I have come to the determination that the video really does look like something someone does for a first project. Still the advice is sound, and I wish to expand on concept.
In the video I used a PNG, which is a lossless compressed format, but not the best tool for streaming images across the internet. For that you should use JPEG.
Now we are talking about JPEG, if your file sizes are still too large (and I mean over 150K) export your image without a background. You will see an instant reduction in the file size as the computer discards all of that white space in the compression.
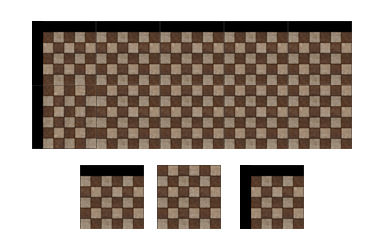
Use tiles! Wait not, not the stuff in the bathroom, well, kinda .. ok it’s close. If you want to sacrifice a little artistic direction, you can make tiles by photographing common materials (such as floorboards, walls, doors, furniture, etc) and build your own dungeon like you would assemble a puzzle. This will require a photo editing program such as Photoshop, or Paint .Net, but when you’re done you end up with a dozen tiny files that are repeated to make up a larger picture. The theory is sense these images are duplicated, the user only has to download a three 64×64 squares instead of a 4000×4000 image to cover the same ballroom floor. MapTools allow snapping, for ease of building, along with rotation tools to spin the images and scale tools to change the size.
