For the second part of starship design, we’ll be focusing on filling out the living, eating and washing facilities on deck 2. This is the largest deck of the ship and once it’s finished, the rest of it should fall into place with relative ease. The “Big Three” locations all ships need for their crew and passengers are: a place to sleep, a place to eat, and a place to,… clean up, after oneself. To begin, we’ll start with the overall look of deck 2, then move into sleeping, eating and restroom areas.
All Aboard
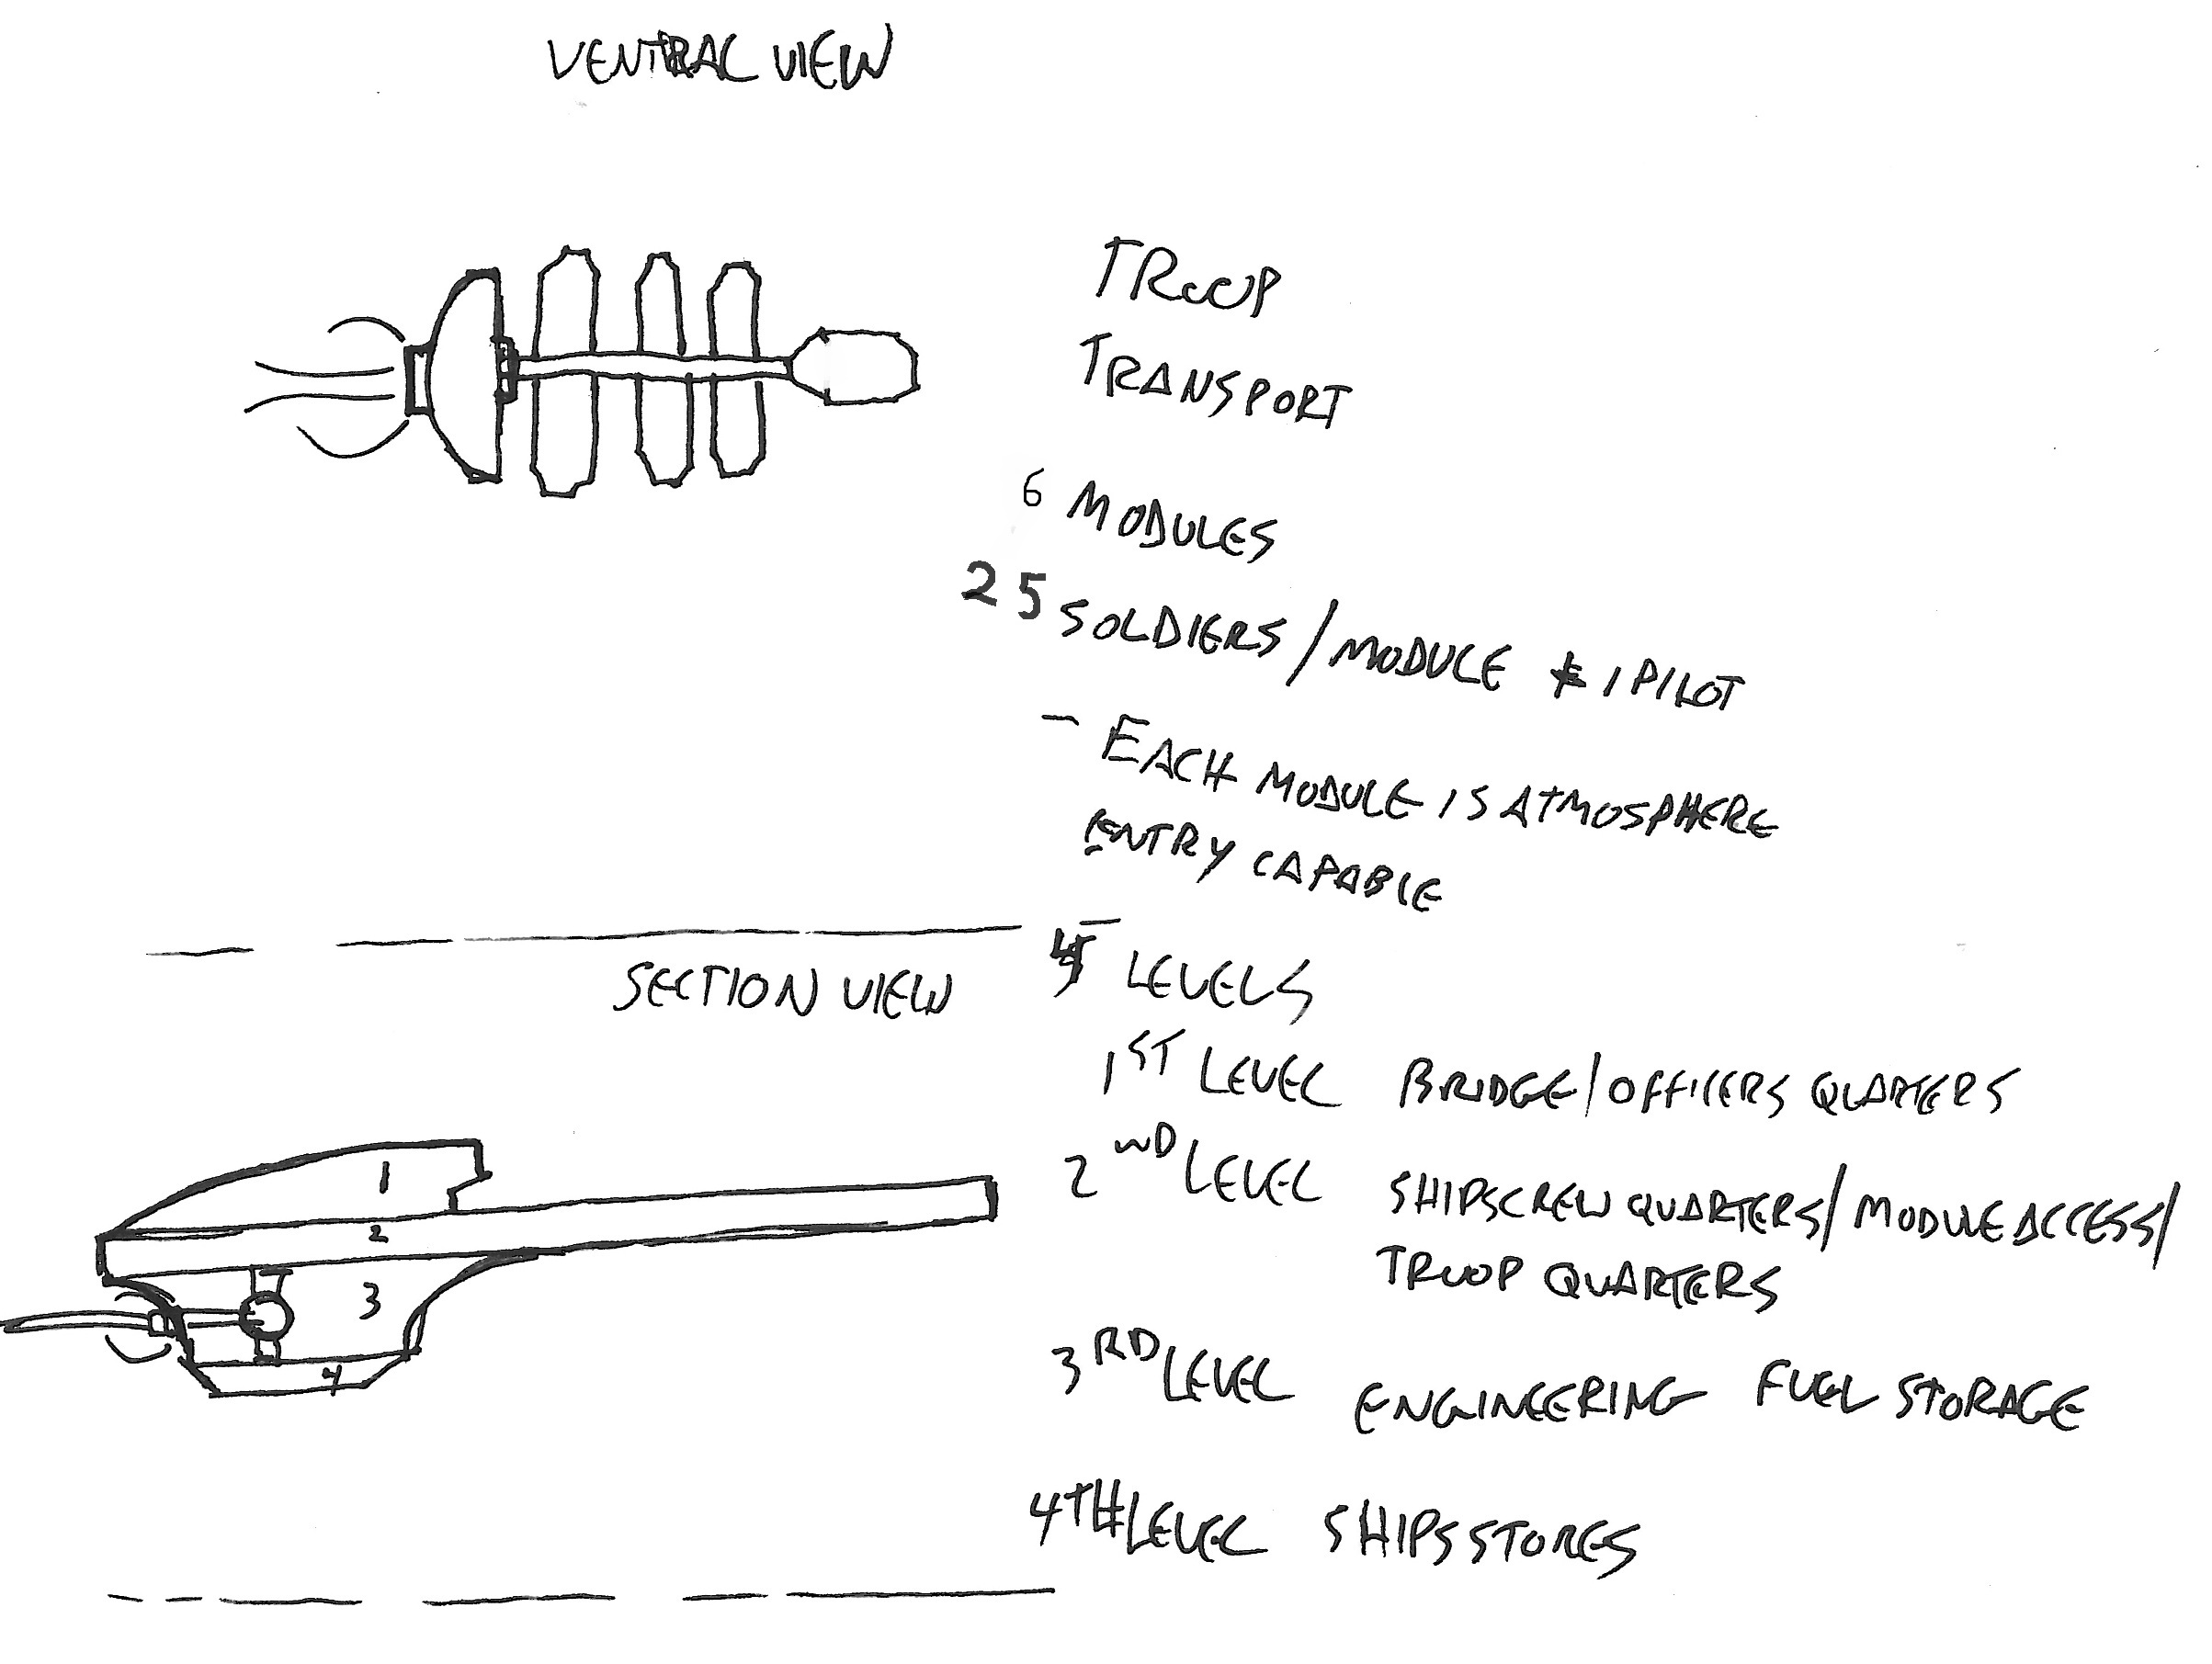
The one thing I noticed right away about my rough sketch from part 1, was its similarity to a boned fish; while this was unintentional, it illustrates how fluid designing a starship can be, and because of that, I decided to change the shape a little.
 Deck 2 is the largest and most physically active section of the ship; the focal points on this deck being, the primary ship’s access area and troop living spaces.
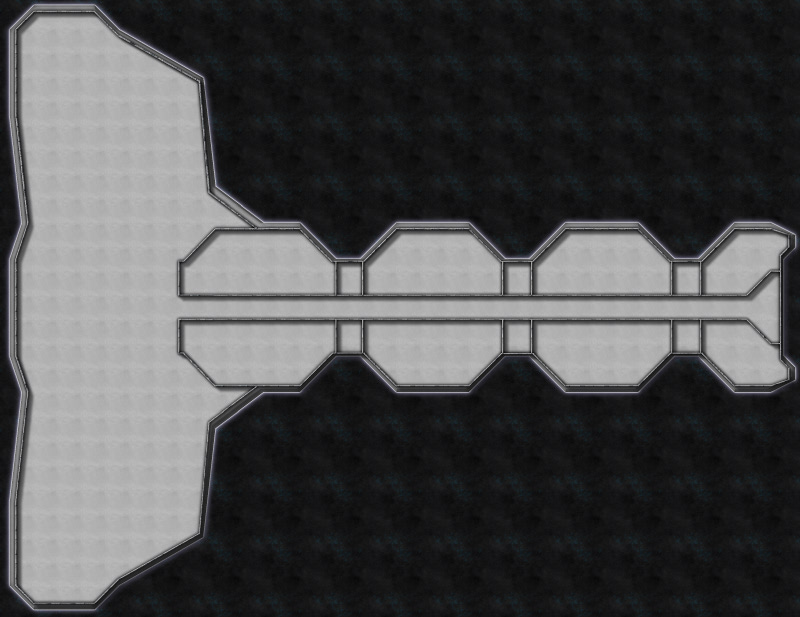
I began by selecting the Hull, Sleek Silver mirrored polygon after right clicking on the Draw Hull button, a custom Snap setting of 5 foot, 1 snap square grid was created. Instead of the original, half moon shape, I decided to create a hull that was somewhat triangular in shape, suggesting forward movement. The deck was drawn next, by selecting the Deck, Lattice mirrored polygon. The Snap for it was changed to a custom 5 foot, 5 snap square grid so there would be a one foot gap between the edge of the hull and the deck. The Bulkhead, Default 0.5′ was selected for the exterior and interior bulkheads and it followed the same Snap setting as the deck. In the picture to the right, the Deck Sheet has been hidden, as I found it visually easier to place bulkheads and symbols at this scale.
The custom snap settings were created by right- clicking the Grid button in the lower right part CC3s drawing window and selecting New…, then selecting 2d Rectangular and applying the settings needed.
The first render of the carrier was ridiculously over scaled (it was nearly 700 feet/210 meters long), and the drop ship place holders were the size of a small building (they should be closer to a city bus). Once the ship was rescaled to a more manageable size (pictured above, about 300 feet/91 meters long), it was time to decide on a starting point. Since all crew/troop entry happens at the “nose” on deck 2, I decided to start there, and branch off to the troop living spaces; the main corridor needs to accommodate 150+ people coming and going with the ship docked and the width was set to 10 feet/3 meters.
You want me to sleep where?
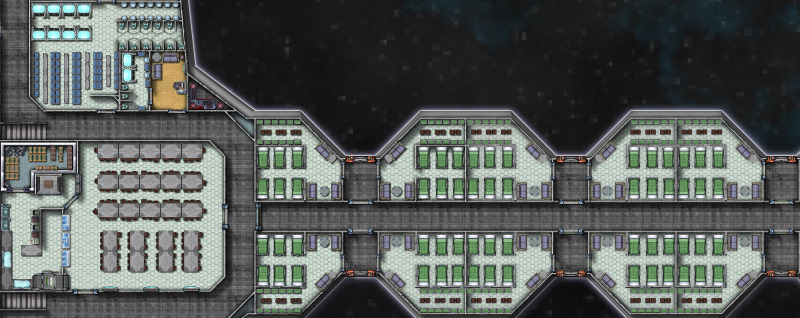
The main corridor and living areas on deck 2 on the working render (above) show a large, dormitory style, bay for troops to sleep in, and the design of the ship called for marginal crew comfort, since they’d be living on board for weeks or months. This meant a modification was needed. I decided to separate the room with a wall; from a narrative standpoint this also adds to passenger safety: If a portion of the hull is breached the loss of life will be lessened. With the basic room layout complete furniture placement was the next step.
 The rooms numbered 1-4 show the progression of furniture placement:
Room 1 (left). This room had 7 single bunks, each with a gear locker, and 2 small chairs along the wall with a large table for a common area. This was a messy, cramped effort with little efficiency and a poor design.
Room 2 (left). 8 single bunks were placed toe to toe and the large table and two chairs were removed, in their place, 2 desks (for writing home) were added and the lockers were set along one wall. Less cramped, but room to improve.
The first two rooms also had the door exiting to the main hall; during an emergency or troop deployments, the hall would fill quickly and confusion would run rampant. The doors for rooms 3 and 4 were moved to the side hall that accesses the drop ship dock area.
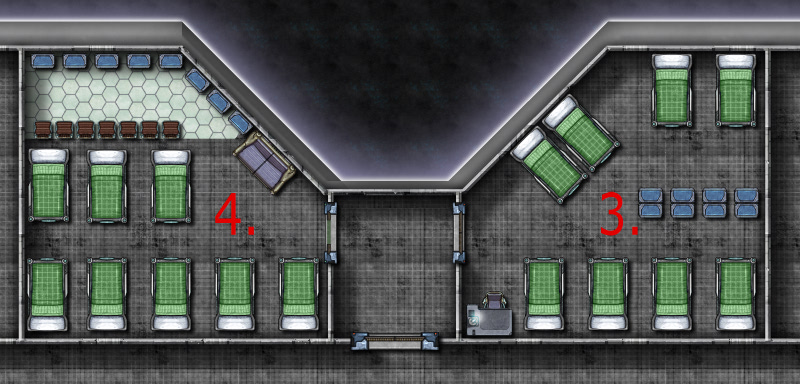 Room 3 (right). The single bunks were moved to the outer walls, the lockers split the room and one table and chair for writing home was removed. Getting closer, but still a lot of wasted space.
Room 4 (right). Moved the single bunks to one end of the room and the lockers to the other. A couch for lounging and 8 small chairs for dressing were added. Better yet, the chairs suggest a wall that separates the sleeping/dressing areas. I also placed Deck, Plastic Irreg for a little visual distinction.
The final room design was broken up into three spaces (below). The sleeping area is separated from the common and dressing area by a wall (inspired by the chairs from room 4) . The single bunks were replaced with double bunks, increasing the occupant count from 8 to 12, and scaled down to 95% of their original size. While this room layout is cramped, it is a military ship after all, I feel that it is much improved from the poorly designed first layout. Once I was satisfied with the room layout I simply used the Mirrored Copies command (accessed by right clicking the Copy button) to quickly duplicate the rooms (Mirrored Copies is a great solution if you have symmetrical ships or buildings with rooms that need to be duplicated across a central point).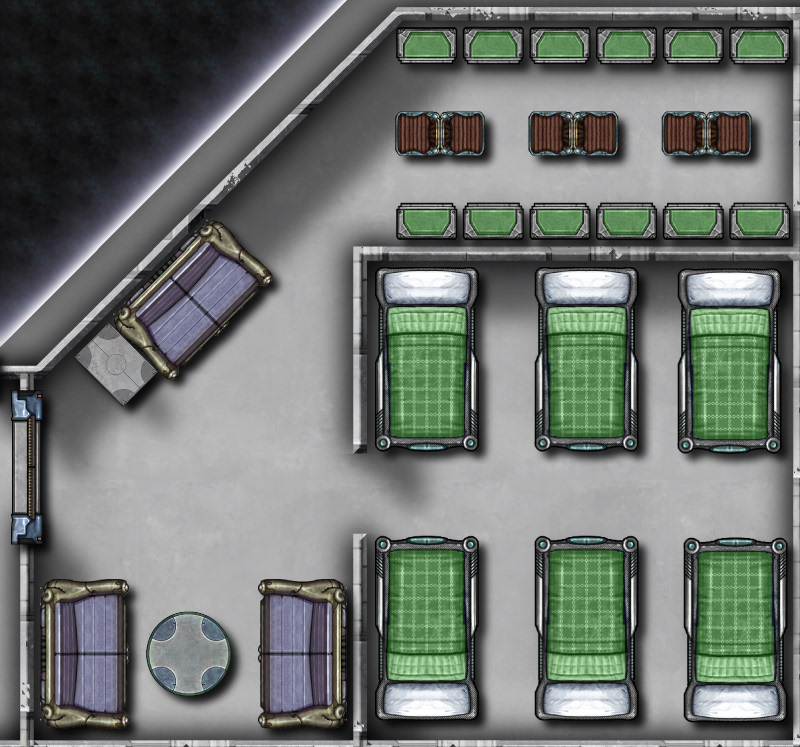
Using the method described above: creating a room, placing symbols and rearranging them for best use of space I then created:
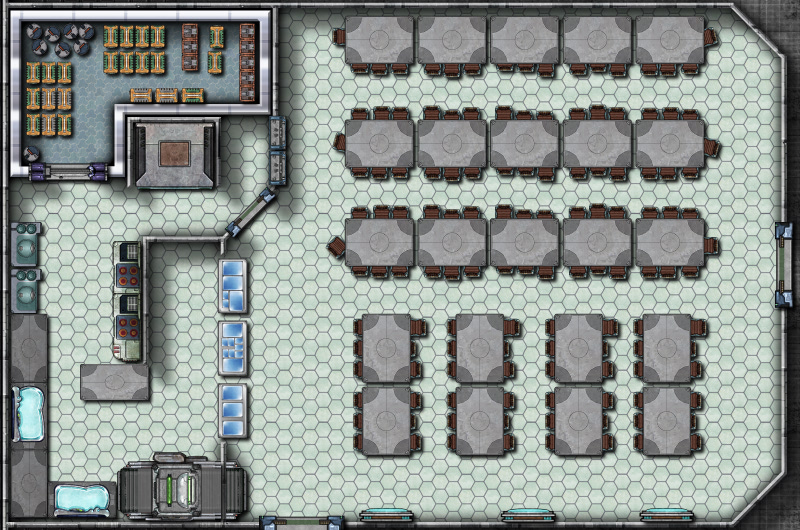
The dining hall, details include (clockwise from tables and chairs) seating for 129 people, steam tables for serving food, a dishwasher, sinks, stove tops and ovens, a walk-in refrigerator and an elevator to travel to the storage area on deck 4 and the crew mess on deck 1.
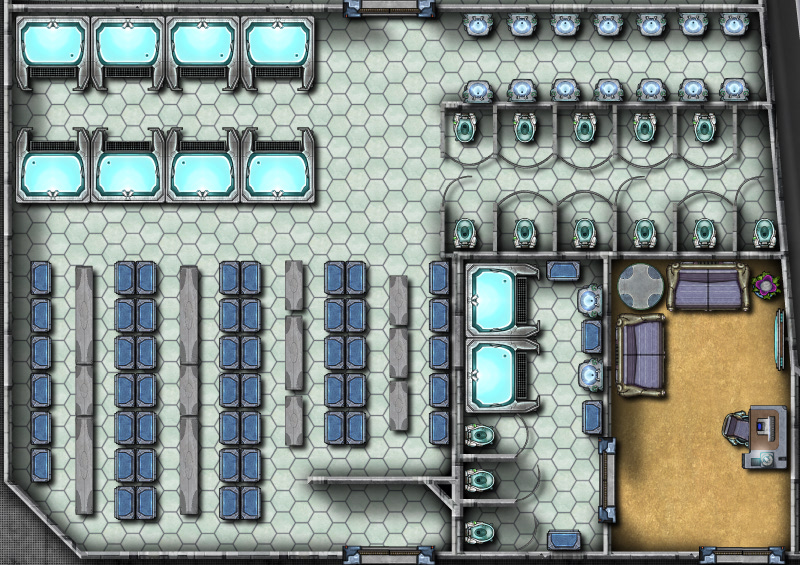
Shower and toilet facilities for officers and enlisted personnel. The enlisted shower facility details include (clockwise from upper left) 8 showers, sinks and toilets, lockers and benches (created by stretching the rectangular table) The smaller officer’s bathroom and lounge were combined to conserve space. Drawing bathrooms is about as much fun as cleaning them for me, there’s no way to make showers and toilets interesting!
With the “big three” completed for deck 2 (pictured below), Deck, Plastic Irreg was added for all sleeping/common areas, by right clicking the Deck Plan button, to create visual interest and to assist viewers with identifying different areas easily. Next time, we’ll be completing the remainder of deck 2’s amenities, including enlisted lounges, armory and firing range, officer quarters and ships operating systems, creating deck1, reviewing how to mirror copies, and the creative mixing of Cosmographer 3s symbols.