The October issue of the Cartographer’s Annual 2021 contains the “Colonial Outpost” map pack, a large collection of pre-drawn buildings for science fiction gaming scenery. It depicts a colonial outpost or settlement with prefabricated houses, a variety of add-ons like a satellite dish, walls, and other little scenery pieces.
The sets are included as pdfs for immediate printing, but you can also modify and adjust the existing CC3+ drawings, as well as create your own designs with the accompanying drawing style. Dioramas 3 is not required to make use of the sets, but will be very useful, if you want to draw your own buildings. Cosmographer 3 can be useful for further flash out the scenery with additional symbols and textures.
The October issue is now available for all subscribers from their registration page. If you haven’t subscribed to the Annual 2021 yet, you can do so here.
Comments Off on Cartographer’s Annual 2021: October
In yesterday’s Live Mapping session I combined tools from Dioramas 3 with assets from Cosmographer 3 to design the paper model of a simple communications tower. You can watch the video here:
As I was quite happy with the results and am currently building some science fiction terrain anyway, I sat down to actually build the model, straight from the print out of the session’s work. Here you see me messing around with paper cutter and glue to build the model:
And finally, here is a picture of the finished model, next to some of my other terrain. Click the image to download the FCW file.
Mapping with ProFantasy’s Campaign Cartographer 3+ has brought my home games to life – especially from my humble beginnings. When I first played tabletop roleplaying games our fledgling Game Master strictly used theater of the mind. Some of us, such as myself, needed the visuals for combat, so we graduated to some graph paper, we were luckily required to purchase for math class, some colored pencils (if we were even luckier), a ruler and one set of dice between us. I, being the only female in the group, and the most artistic of the lot, usually was tasked with drawing out our GM’s map vision. This went on for a few months … enter the Satanic Panic of the 80’s, combine that with Italian – very Roman Catholic- immigrant parents and my days of D&D were done.
About 10 years or so ago, one of my old middle school D&D friends and I started playing again. This time I was our Dungeon Master and quickly took up my old habit of making up the maps. I did this by hand for years until 2015 when I found ProFantasy’s Campaign Cartographer 3+ and started printing out my maps on poster. I first set myself up with a guide for Dungeon Designer depending on what size map I had intended on printing out as several of the vendors I use print in different sizes (such as Staples, Office Max/Depot, and VistaPrint). For poster sizes 11”x17” set at 55’x85′, 16”x20” set 80’x100′, 18”x24” set 90’x120′ (this is the most common poster print), 24”x36” set 120’x180′ and the largest map I’ve printed to date 36”x48” set at 180’x240′. My players have loved the colored maps, the assets and add-ons CC3+ give my players visuals they’ve only seen on virtual tabletop gaming not ACTUAL tabletop. It was a game changer.
Always looking to surprise and delight my players with an encounter, I took my mapping to the next step. I decided to start applying my many mediocre crafting talents to use and combine them with my maps. My first foray into craft mapping was a simple as getting some rocks and stones from outside my apartment, cleaning them off and laying them down over some rocks I had placed on an Outdoor Forest Encounter map. My adventuring team loved that they had something to actually hide their minis behind. As a Dungeon Master, I was THRILLED! I started to find some of our encounters were a bit boring as the players weren’t using the terrain on the maps to their best advantage. With this small added addition, it seemed to click, and we were off!
Next project…. Clay. For sculpting amateurs out there like myself, and little to no investment, you can purchase some air-drying clay. This is used to create “mounds” of terrain to place on maps. With some modpodge, acrylic paints and some model landscape turf, and even a few rocks and twigs from outside, I was able to create some fantastic terrain elements to add to my maps. Depending on the kind of investment you’d like to make you can then begin to add in some trees. These can be made by purchasing premade model terrain trees, creating your own with wire and terrain foliage, or even better, this time of year, with all the trees and bushes in full bloom, you can trim off some branches and bushes, insert them into the clay before drying and have an instant forest element!
Papier-Mâché is another great way to add some cliff terrain to an already awesome map. You can see my original map. It really was just fine the way it is, but this encounter I had planned was a key part of their main story arc, so I wanted to make it special. This section of the cave I knew would be layered cliffs of ice…so how could I achieve this? Yes, back to grade school art class and papier-mâché ice cliffs! I started here with a piece of foam board to use as a base, after sealing that, I began to layer the papier-mâché, making sure to make it jagged, like ice would be. After drying, I painted it with white and shimmering white paints, added some silver and iridescent glitters, some tufts of cotton balls for snow and some broken glass and mirror fragments purchased at a local craft store as a finishing touch.
My latest crafting project has been my favorite, to date. I knew my players would eventually be taking a boat trip, and I had a pretty cool encounter planned for when that happened. I found a free .fcw file of a three-deck caravel and did what I do with free. fcw’s…. made it my own. I used the bones of the ship and changed the fill styles, changed the symbols to a photorealistic version and printed out the map of the three decks on a large poster. My intent was to play the encounter on the poster, but again I started thinking about how I can enhance the encounter. I was looking at the boat and realized the mast was the exact size of a dowel I had picked up at a local craft store clearance not long ago. So, I began to cut out the ship from the poster, then traced and glued it onto a thin poster board. Cut a 1” wide dowel into three individual 4” masts and paint them to look like wood. I also painted the underside of each deck to look like aged wood planks. Then each mast was glued onto the floor of the deck and put a piece of sticky tack on the top of each mast, to attach to the deck above and still be easily separated for more in depth exploration of the deck. I placed the ship on a map of water I had created, and poster printed, added some undersea monster minis in the water, and turned this boat into one of the most exciting and fun encounters to date!
All these crafting ideas can be done on a variety of budgets. There are so many items around your home that can be incorporated into terrain, just use your imagination and a little ingenuity. Just look around and use what you find in your own home, craft closet, workshop, or gardens and enhance your CC3+ maps to this next level of fun!
About the author: Lorelei was my very first D&D character I created more years back than i’d like to remember. When I decided to venture into creating maps for my and others rpgs, I thought I owed it to her to name myself Lorelei Cartography, since it was her that led me to the wonderful world of tabletop gaming in the first place. Since then I have been honored to have worked with companies such as WizKids, Pelgrane Press, and ProFantasy.
Here it is: the full release of Dioramas 3. Pimp your game and create your own paper models with hundreds of new bitmaps and symbols to choose from.
Design your model in real-world scale and then print at whatever modeling scale you want to build. Pick a pre-defined model from our large range of samples and adjust it to your requirements, or build something new completely from scratch.
Dioramas 3 includes instructions for printing and assembling your paper model so you don’t need any prior experience in paper modelling and the included examples give you plenty of material to practice on.
Dioramas 3 is available as an upgrade from Dioramas Pro and features the following new material:
Two new bitmap drawings styles in addition to the updated vector style.
275 new bitmap textures (compared to 22 in Dioramas Pro)
700 bitmap symbols of doors, windows and other wall features
Loading/saving of diorama panel settings (no more setting them up for each new panel)
If you want to try your hand at paper modeling with craft knife and glue before you jump fully into Dioramas 3, we have two examples buildings for you to download in pdf format.
Sage’s Tower
The reclusive sage dwells in this lonely tower somehwere on the outskirts of cilized lands. What will the adventurers find inside when they arrive to get his advice?
Village House, Church and Tower
A tiny village nestles into hills, sporting a few houses, a church and a lonely tower, guarding the townsfolk from marauding orcs and goblins.
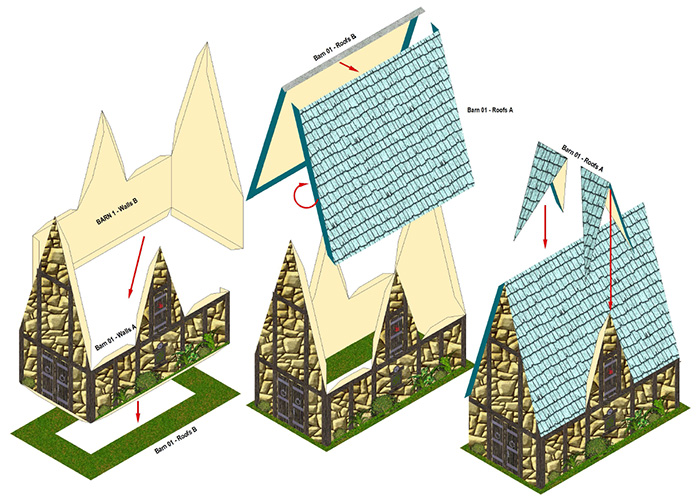
The release of Dioramas 3 is imminent and we’re celebrating the occasion with a map and tutorial pack of a Bridge Diorama. The 9-page tutorial takes you through the design, construction and assembly of a multi-part bridge model. By printing and assembling as many parts as desired you can create a bridge of any required length.
The July issue of the Annual 2018 previews a few of the new bitmap textures included in Dioramas 3, and once that is released, you can replace or expand the included textures in the drawing with the full set. The model is included both as a FCW file and a set of three A4/US Letter pdf pages that you can print as often as you like and need.
You can subscribe to the Annual 2018 here. Once you have subscribed, the July issue will immediately become available for download on your registration page.
As mentioned before on this blog, I am currently working on the full new version of our paper-miniature building add-on – Dioramas 3. I am pleased to report that we have a completed alpha version and release of the beta version is not far off. All the new assets are in place, and have been arranged in multiple drawing styles: two different bitmap styles and one vector style, recreating the old Pro-version style with some sheet effects added.
Next up is updating the Essentials Guide to take all the new stuff into account and producing a nice, big new example Diorama set. Checking on the Facebook community group people seem to be mostly looking for some common village buildings, so it’ll be a inn and tavern I’ll be creating – I’m looking at you, Tendril’s Oak Inn.
This will probably also mean breaking out my paper cutter, ruler and glue and getting my hands sticky to actually build the thing. It’s been a while since I’ve done that and I’m looking forward to it!
Here is the very first Dioramas building I ever designed and built, updated with the new bitmaps of Dioramas 3. It’s a rough recreation of the Sage’s Tower symbol from the “Fantasy Colors” set included in Symbol Set 1. The actual model I built has long gone the tragic way of all paper models: crumbled up and vanished into the recycling bin. But hey, now it can reincarnate as a new and prettier one.
What have I been up to recently, you may ask? Well, I will answer, I’ve been working to make Campaign Cartographer 3 obsolete. But, I hasten to add, only by updating everything to work with CC3+!
Campaign Cartographer 3 and CC3+
When we release a new version of Canpaign Cartographer, we go through a long process of making all the add-ons compatible. While the process continues, users need to keep CC3 and CC3+ installed to use all our add-ons. That process is nearing its end.
Dioramas Pro
The only standard add-on that wasn’t available for CC3+ yet, is Dioramas Pro. While we are also working on Dioramas 3+, we decided to release the compatibility update for Dioramas Pro, so you don’t need to keep CC3 installed for that single add-on. That compatibility update is available on the registration page now, among the other Diorama downloads. It allows you to use all the existing functionality and example maps in CC3+.
This removes the slightly frustrating issue that the popular Fantasy Mapper bundle still required you to install CC3 if you wanted to use all of its assets.
Dioramas 3
But of course we don’t want to stop at that. The main project I’ve been working on is updating and expanding Dioramas into a true version 3+ product, with expanded bitmap support, drawing styles and everything. To that effect, Sue Daniel has created new tiling bitmap textures to greatly expand the range of available “materials” that can be used for the models, from straw-covered floors, via adobe walls to roofs of corrugated tin.
Dioramas 3+ will be our next big release and we are excited to see all our drawing add-ons updated to full version 3 standard.
Which brings me to the final products that need to be updated: the Source Maps series.
The Source Maps
Remy has created compatibility updates for SM: Castles, SM: Temples, Tombs and Catacombs as well as SM: Cities and is working on one for the World War 2 Interactive Atlas. I’ve created the setup files for the formerthree and these are currently in beta-testing and – barring any major issues showing up – should be available next week.
After Dioramas 3+ we’ll be looking at giving the Source Maps products the “version 3+” treatment, though we are not entirely sure how that will look yet and how many new maps it will entail. We’ll keep you posted, but in the meantime here is a little sneak peek how parts of it may look:
Build a wonderful village diorama, designed by community member Old Krom and embellished and documented by Joachim de Ravenbel. Hundreds of symbols and dozens of bitmap fills are there for you to use in your own Dioramas projects as well. Take a look at a photo gallery of the finished village below. If you haven’t subscribed to the Annual 2014, you can do so here.
Coming soon: The Annual 2015 re-subscription offer and December bonus content!
We’ve started into 2012 with our new Annual subscription and a combined map pack for creating dungeons on the table. “Combined” because it contains the tools for doing it either as a “flat” 2d version or – if you are into building your own paper models – as a 3D model. Continue reading »
Dioramas Pro is one of the more rarely used add-ons of CC3 – rather undeservedly though in my opinion. With a little care and patience it can create some spectacular setups for your gaming table.
This month’s Annual provides an example of what can be done with Dioramas, plus the tools and templates to create more paper models. So, break out those hobby knifes and glue bottles and start modeling… Continue reading »
 The October issue of the Cartographer’s Annual 2021 contains the “Colonial Outpost” map pack, a large collection of pre-drawn buildings for science fiction gaming scenery. It depicts a colonial outpost or settlement with prefabricated houses, a variety of add-ons like a satellite dish, walls, and other little scenery pieces.
 The October issue is now available for all subscribers from their registration page. If you haven’t subscribed to the Annual 2021 yet, you can do so here.